Healthy, Savory Soup: Curried Corn Bisque
Every New Year I make a resolution: To get on the fast track to a healthy diet. To cleanse myself of all the junk I've been gorging on over the holidays. To eat better so I can feel better.
Read MoreFood. Drink. And all the things!
Every New Year I make a resolution: To get on the fast track to a healthy diet. To cleanse myself of all the junk I've been gorging on over the holidays. To eat better so I can feel better.
Read MoreThese are my favorite cookies ever. It's not even because I like chocolate chip cookies. I love these cookies because of how happy they make my loved ones.
Read MoreEggplant makes for the perfect flavor sponge -- it soaks up that fiery, smoky flavor from the grill. Paired with crunchy red bell pepper, nestled on a bed of fresh spinach, smeared lovingly with hummus and then tucked away into warm pita bread, it makes for the substantially perfect meal.
Read MoreWhen I first heard about flaxseed I thought the same thing I normally do about healthy food -- "yeah, yeah, it's good for you. But does it taste good?" And so, I shied away from it for some time before finally trying it out. As it turns out, this seedy super food can either be tasty... or can go virtually unnoticed in your dishes. If you're wary about flax seeds, try sneaking them into some of your already-existing recipes. I like to blend it smooth in my daily breakfast green smoothie, and I like adding it to baked recipes, like banana bread and dark chocolate biscotti. But first, you may wonder, what's so healthy about flaxseed? WebMD breaks it down:
Aside from the obvious health benefits, adding flaxseed to your food gives it an added texture. So what else can you add it to? Try these:
Flaxseed photo by Flickr user Alisha Vargas.
I'll admit it: I'm lazy. Although I try to be mindful to give ingredients the time and respect they deserve, I also try to cut corners whenever possible. This means blanching all my veggies in one pot -- regardless of color (and yes, I've blanched a whole beet, potatoes and peas all in one pot and had no trouble at all), and periodically reaching for the can of crushed garlic in my refrigerator (but don't tell anyone that shameful secret!). So I figured it only makes sense that I'd "cheat" my way through a potato chip recipe. Ordinarily, one would fry these in a big pot, but I try to bake rather than fry whenever possible. Usually, you can just leave the food in the oven and forget about it temporarily. Plus, it's healthier. When making potato chips, you have to slice the potatoes very thinly, about 1/8 of an inch. You may be able to do this with your trusty chef's knife, but I prefer to use a mandoline. It's much faster and more accurate. Just be careful you don't shave your fingers!

Serves: 4 Prep time: 5-10 minutes Cook time: 20-25 minutes
Ingredients: 2 large Russet potatoes 3 tablespoons olive oil kosher salt and pepper
1. Preheat oven to 400 degrees.
2. Wash and scrub the potato. Leaving the skin on, slice into 1/8" rounds.
3. Soak the slices in a bowl of water for a few minutes to rinse some of the starches off. Dry with paper towels.
4. In a clean bowl, toss the potato slices in olive oil. Arrange in one layer on a silicon baking sheet mounted on a sheet pan.
5. Sprinkle generously with salt and pepper. Bake for 20-25 minutes, or until the edges are golden brown. Sprinkle with salt again.
My Notes: Can I use additional seasonings? Of course! Be creative! When the chips are done baking, try sprinkling some cayenne pepper (for a spicy kick) or grating some Parmesan cheese over the top (because who doesn't love cheese?).
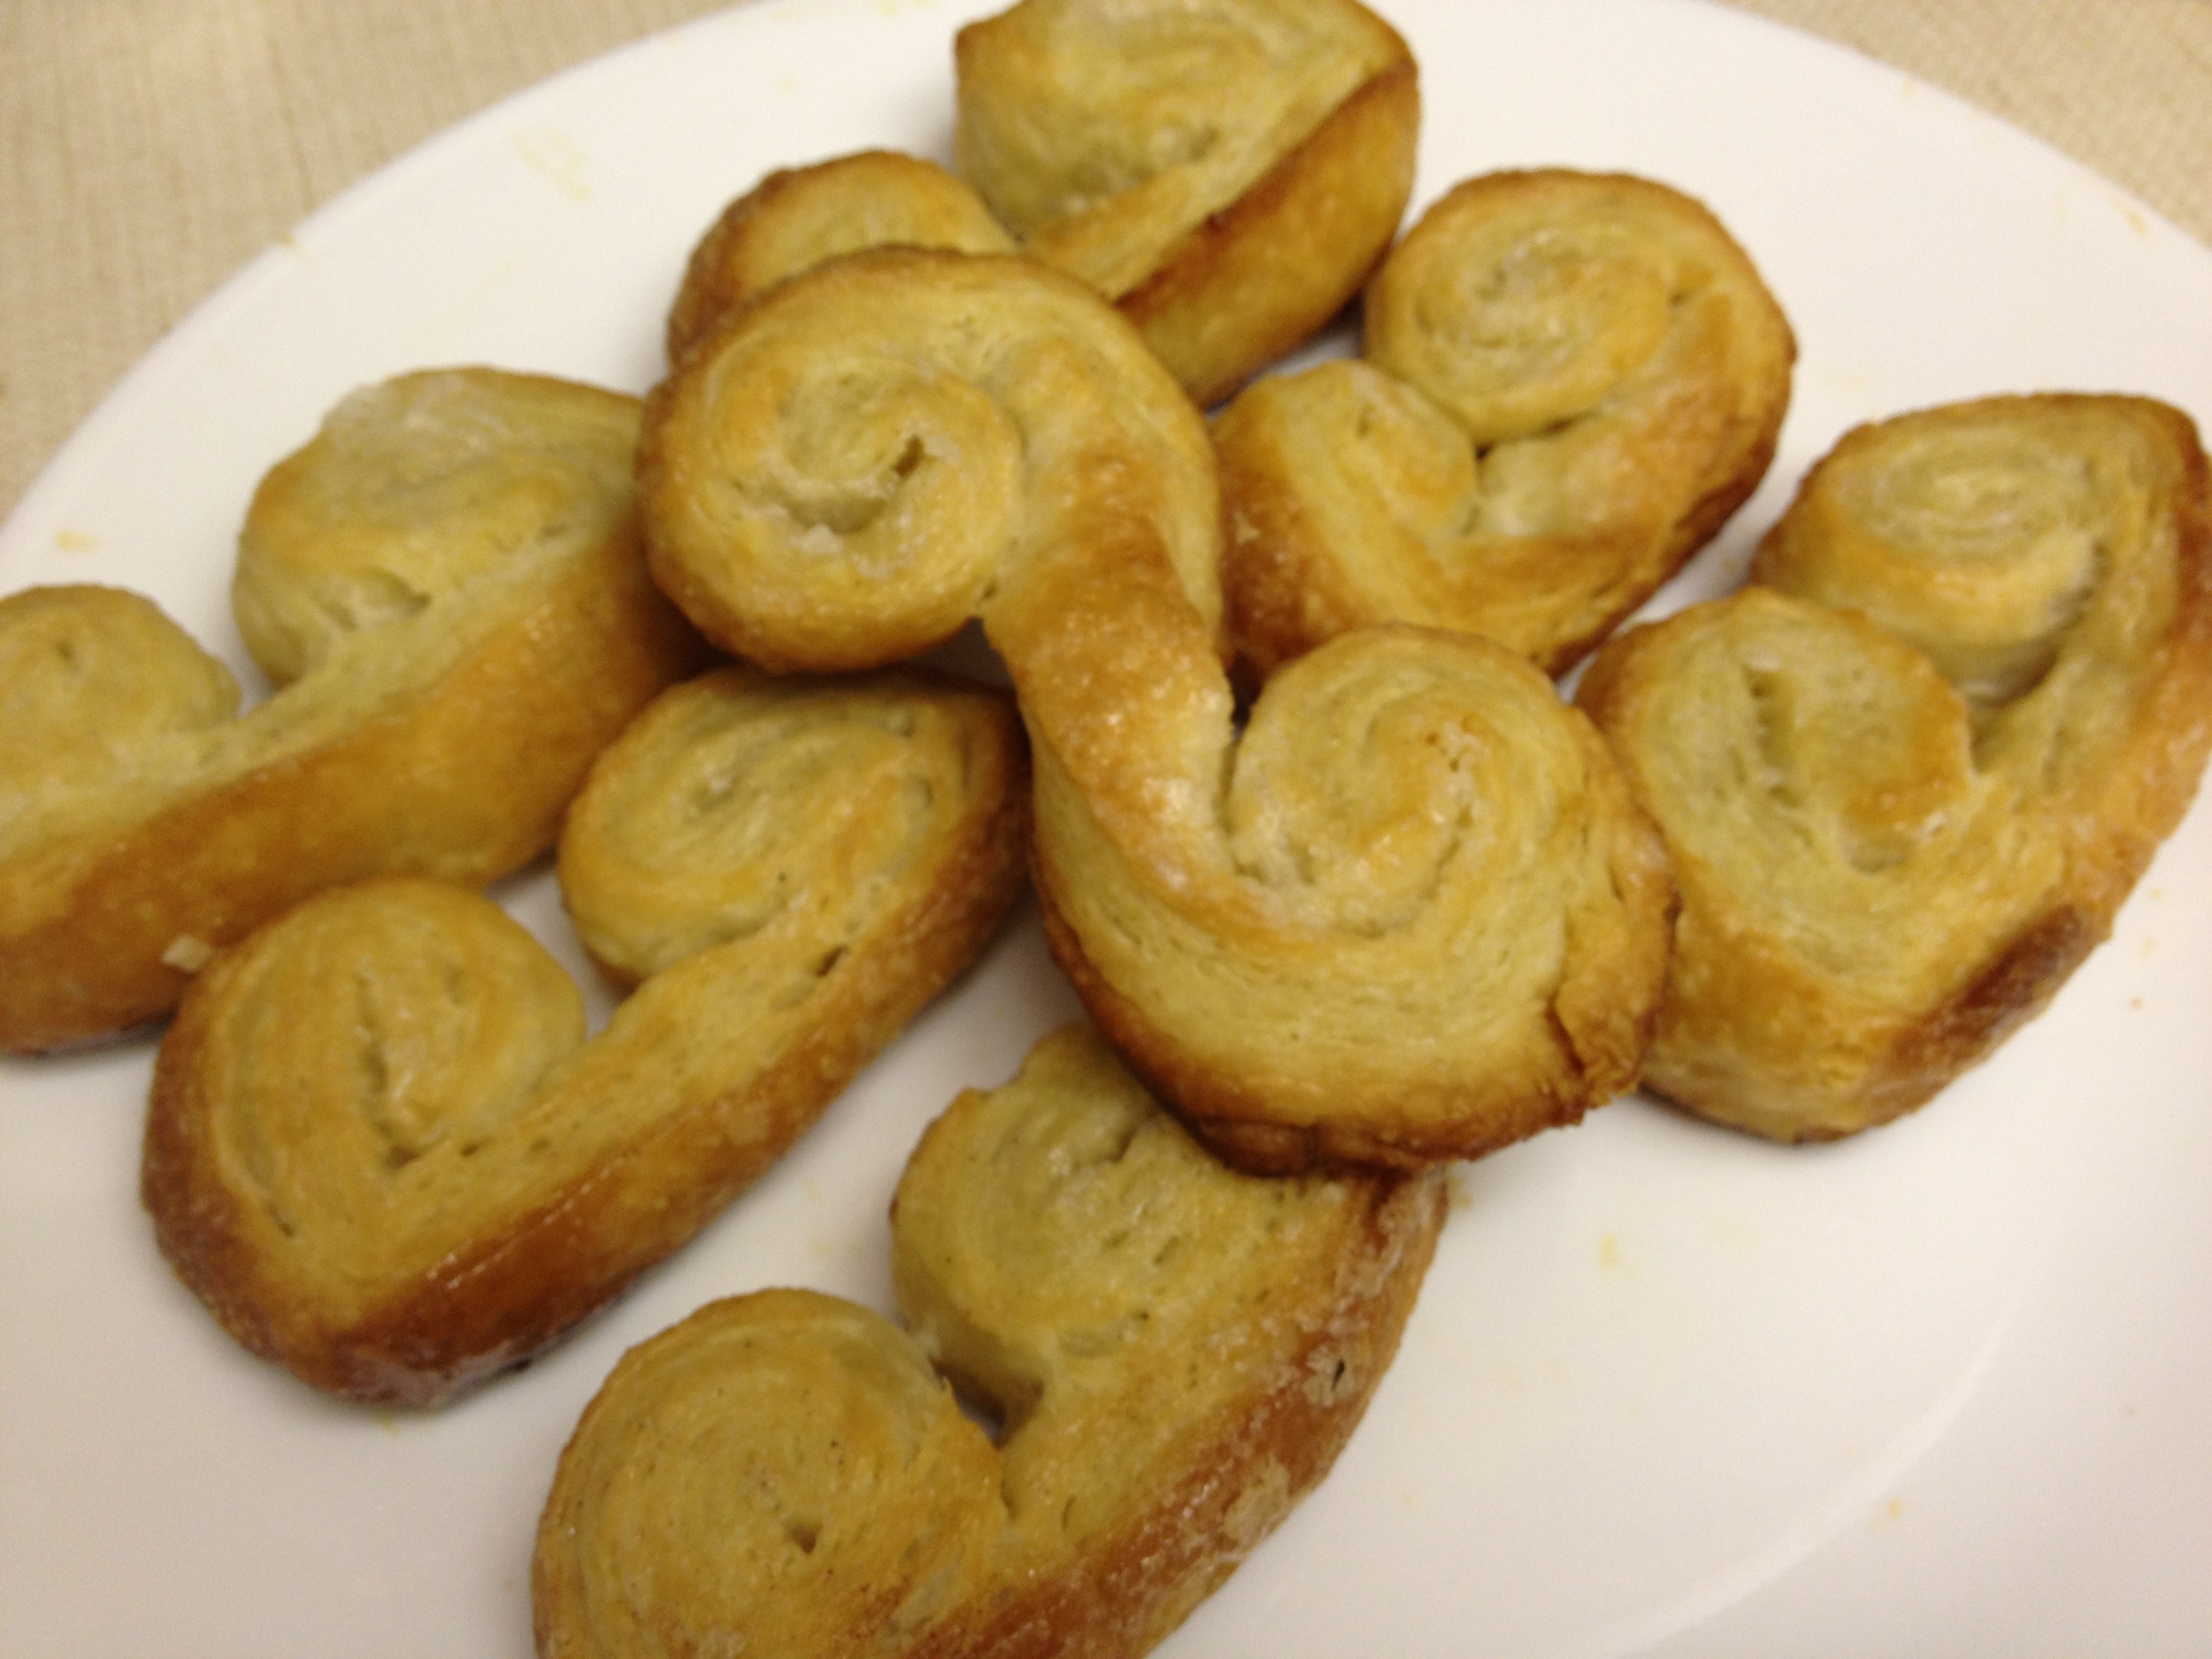
You know those really cute, really sweet, really crunchy cookies that are rolled up to look similar to elephants' ears? I don't like them. I don't understand their use. You never see them at parties and you never hear your girl friend say, "You know what sounds delicious? Elephant ears!" I can only imagine these cookies at a tea party, the guests obligingly biting into them after having scarfed down all the mini cucumber sandwiches and scones. And so, when my chef instructor at Le Cordon Bleu recommended we make these Palmiers puff pastries, I paid attention to her demonstration of preparing the cookies, but then blew it off mentally. Why don't I like these cookies, you ask? They're too sugary. They're too crunchy. You bite into one, and instantly, crumbs go flying about in every which way but into your cupped hand held up eagerly to catch the mess below your mouth. But alas, after class, I had more leftover puff pastry dough than I knew what to do with. (After all, I couldn't subject my arteries to making any more Brie en Croute.) So I decided to give these Palmiers a try. But I baked them at a lower temperature so they had a lightly crispy, totally flaky outer layer, but soft inside.

Serves: 12-16 cookies Prep time: 5-10 minutes Cook time: 20-25 minutes
Ingredients About 8 ounces Puff pastry dough - 1 store-bought sheet or homemade 1/3 cup sugar 2-3 tablespoons cinnamon A cup of water
1. Preheat oven to 375 degrees.
2. Roll out the dough into a rectangle, about 1/4" thickness.
3. Mark the middle lengthwise, just by putting a small indentation with your index finger.
4. Lightly coat the whole surface of the dough with water.
5. Mix cinnamon and sugar in a bowl and sprinkle over the whole surface of the dough, coating an even layer of sugary oodness.
6. Gently roll up each side of the puff pastry dough to that middle indentation point. Leave a 1/4-1/2" space in the middle,
7. Slice the dough in 1/2" pieces, then move to a parchment-lined baking sheet, laying them on their sides.
8. If you have some leftover cinnamon-sugar, you can sprinkle it lightly onto the cookies.
9. Bake cookies until light golden brown, about 20-25 minutes. But to be safe, check them at 15 minutes.
My Notes: What if I want crunchier cookies? For a crunchier cookie, bake them at 425 degrees until golden brown. This will take less time, of course, and will likely be finished in 8-10 minutes.
Ah, the panini maker. It's one of those household items you yearn for when you don't have one, yet one that collects dust in the back pantry when you do have one. It's sort of like the backyard swimming pool of kitchen appliances. I'll have to admit, up until the other day, my own panini maker was sitting on top of my refrigerator, lonely and unused. But a recent burst of creativity (and surplus of fresh vegetables) changed that. Here's a fresh and hearty sandwich recipe that you can put together and press into your panini maker within a few minutes. It even includes an easy homemade Dijon-parsley vinaigrette. You can use any meat or cheese you like, but this particular recipe calls for roast beef and gruyere, my favorite deli meat and favorite sandwich cheese...

Makes: 1 sandwich Prep time: 15-20 minutes Cook time: About 12 minutes
Ingredients: For the sandwich: 2 slices French bread (or the bread of your choice) 2-3 thin slices roast beef 1 slice gruyere cheese (or several tablespoons grated gruyere, or the cheese of your choice) 3-4 button mushrooms, thinly sliced 4-6 spinach leaves, trimmed 2-3 red cabbage leaves, very thinly sliced 2-3 thin slices red onion 3 tablespoons olive oil
For the dressing: 1 teaspoon red wine vinegar 1 teaspoon Dijon mustard 1 tablespoon parsley, finely chopped 2 tablespoons olive oil
1. Turn on panini maker. If applicable, set to medium-high setting.
2. Make the dressing: Whisk together red wine vinegar, Dijon mustard and parsley. Slowly whisk in the olive oil. Set aside.
3. Wash, dry and slice the vegetables (mushroom, spinach, red cabbage and onion). Lightly toss the sliced mushrooms in the vinaigrette and set aside.
4. Warm 1 tablespoon olive oil in a pan. Add the red onions and soften, cooking over medium heat about 2 minutes. Add the red cabbage and cook until slightly softened, about 3 minutes. Set aside.
5. Brush dressing onto the inside slices of the sandwich bread. Layer all the vegetables (raw and cooked) onto one of the slices of bread. Add meat and cheese. Place other slice of bread on top.
6. Lightly drizzle both outsides of the bread with remaining 2 tablespoons (or perhaps even less) olive oil. Press into panini maker until light golden brown. (If using a medium-high setting, this should take about 12 minutes.)
My Notes: Why the vegetable saute? To be honest, I sort of cheated with the red onion-and-red-cabbage saute. I sauteed them the night before for dinner, and just used the leftovers in my sandwich. You can nix these components if you don't feel like sauteing, but I thought the cabbage gave a textured light bitterness that paired well with the slightly sweet but tart red onions. And this mixture is a nice contrast to the raw mushrooms and spinach.
Why the vinaigrette? Because this panini is essentially a salad (with protein and cheese) tucked into bread, the vinaigrette gives a boost of bright flavor, one that complements the veggies perfectly.
Why toss only the mushrooms in the vinaigrette? For flavor and neatness. The mushrooms are little pieces that carry the vinaigrette well. Because they're little, they won't drip oil 'n vinegar onto your panini maker, and they keep the sandwich easy to eat.
What: Seafood, Japanese/French/American fusion Where: Providence in Los Angeles
Must-Order: Wild Striped Bass (pictured below), Santa Barbara Sea Urchin, Japanese Kanpachi, Santa Barbara Spot Prawns

The Verdict: Providence in Los Angeles, near Hollywood, doesn't just offer remarkable dishes; it presents a culinary experience unlike any other. This is one of those "package deal" type places: The dining staff is welcome and eager to impart all the knowledge they have on Chef Michael Cimarusti's food. Best of all, the servers pace each course so that you're not barraged with dish after dish; they time it well and don't rush you. The ambiance is simple and elegant; the decor evokes the sense of being underwater... if a swanky bistro existed under the sea.
But just a warning: Providence ain't cheap. Save up or come here when you get a bonus at work or when you're celebrating a special occasion. The best way to maximize your experience here is to get a tasting menu; five courses is $95 (or $140 with wine pairing) and the chef's menu goes for $175 (or $270 with wine pairing). My friends and I enjoyed the in-between option, the full tasting nine course menu for $125. We opted not to get the wine pairing, which would have been $190.
Normally, I'd pick out a few stand-out dishes to write about but every single dish from Chef Cimarusti was perfection. Flavors were balanced perfectly, portions were small enough to keep you wanting more. So below, read on and take in the food porn of the nine dishes I enjoyed, including two extra small dishes I shared with my friends.

We kicked off the meal with an amuse bouche, which, by Providence tradition, always involves spherification, the process of shaping liquid into spheres. From left to right: Mojito Gilette, Greyhound Sphere, Gruyere cheese bread, ad a shot with a savory port at the bottom. My favorite was the Greyhound Sphere; it was like eating a bubble that popped to release the refreshing flavors of vodka, grapefruit and lime.

Here, the Japanese Kanpachi brings sushi to new heights. The raw, clean, oh-so-fresh fish was paired with crispy rice crackers, Australian finger lime, and perched atop a small pool of creme fraiche.

The presentation of Santa Barbara Sea Urchin is what entranced me first: The plate or base resembled a tree trunk and the wire basket served as a nest for the brown egg that held bits of sea urchin swimming in a bath of champagne beurre blanc and herbs.

I'm a sucker for scallops and it's disappointing when they're overcooked. They become rubbery and tastless -- ick! Of course, here, Nancy's Down East Sea Scallops are cooked just right; the outside has just a little bit char and the inside is soft and yielding. These were perfect with buckwheat, dashi and napa cabbage.

If I had to choose one favorite, it would be the Wild Striped Bass. Served with a brown butter, lemon and nori sauce, it also comes with braised cannellini beans. The bass is slightly smokey and firm, and the beans are surprisingly soft without being mushy and grainy.

Here, the Tasman Sea Trout marries fish with fruit and vegetables. It's served with with cooked beets radish and orange slices. A few springs of fennel add just a hint of licorice flavor.
If you're a veal virgin (as I was, up until last night) you might be uneasy as to what it should taste like. But this is a meat that's best served medium-rare; cooked any more than that and you end up with a gamey clump. The Marcho Farms Veal Tenderloin here is slow cooked at 140 degrees with a curry-daikon sauce. Daikon radish is braised, chanterelle mushrooms are slightly crispy and pearl onions are smooth and delicate. The black truffle fondue is icing on the cake.

These Santa Barbara Spot Prawns weren't part of our nine-course meal. They were just an extra goody we ordered. Salt seasoned with sprigs of rosemary is heated at 350 degrees and the prawns are cooked in them for just a few minutes. Served with just a touch of olive oil, they're salty and simple.

Some fine restaurants boast garnishes of truffle, a type of rare and expensive mushroom, but they shave about a teaspoon atop your food. Thankfully, Providence is generous with their portion of Black Winter Truffles, that's served with risotto, pasta alla chitarra, a little bit of soft scrambled eggs and raviolo all'uovo. This dish is vaguely Italian, vaguely French, and slightly garlicy -- it features hints of layers upon layers of earthy savory flavor.

No fine dining experience is complete without an assortment of cheeses. Various types of goat, sheep and chow milk are used and served with candied walnuts, dried figs, apple and apricot jam, and a pumpernickel baguette. My favorite was the Sotto Chenerre, cow cheese with truffle rind.

To cleanse the palette after that epic meal, we had lemongrass granita with sake jelly and ginger foam. It definitely reset our appetites to prepare for a memorable dessert.

And finally, our very last course: dessert. Banana Bread Pudding served with barley ice cream and drops of orange sauce evokes flavors of autumn and winter. The ice cream is somehow savory and sweet and the whole dish tastes like a holiday on a plate.
Depending on who you are, when faced with a pound of raw shrimp, you either roll up your sleeves, get peeling and whip up your favorite recipe, or you cringe and tentatively poke the cold, gray bag. If you fall in the latter category, fear no more -- though this dish has several ingredients, it's easy to make and it's foolproof. And if you already have your own go-to shrimp prep steps, give this recipe a whirl. It's savory, saucy and has hints of Cajun flavor.

Serves: About 6-8 Prep time: 25 minutes Cook time: 7 minutes
Ingredients: 1 pound raw shrimp, peeled and de-veined 1/2 stick of butter (or 4 tablespoons) 1-2 tablespoons minced or crushed garlic 2 tablespoons Worcestershire sauce 1 tablespoon basil 1 teaspoon oregano 1 teaspoon cayenne pepper (optional) salt and pepper, to taste
1. Melt the butter in a skillet on medium-low heat. Add garlic and a sprinkle of salt and pepper. Increase heat to medium and add the peeled and de-veined shrimp. Stir.
2. After about 2 minutes, add the Worcestershire sauce, oregano, basil, cayenne pepper and a dash more salt and pepper. Keep stirring and turning shrimp until they curl and turn slightly pink. (Hint: Cook until you don't see any more gray).
My Notes: Changing the proportions: My favorite thing about this recipe is that while the flavors are sophisticated, cooking is a snap because you don't have to measure out each ingredient. Does the shrimp look a little dry? Add a dash more Worcestershire. Not seeing enough flecks of herbs? Toss in another pinch of oregano and basil. Not enough heat? Of course, sprinkle a bit more cayenne pepper.
How to de-vein shrimp: Some chefs would say de-veining is an absolute necessity; the cooked shrimp looks fuller, curlier and neater. And after all, it is cleaner; eating poop isn't necessarily on everyone's to-do list. Others shrug off the practice and prefer the shrimp in their natural state. In order to properly de-vein, take a small knife and cut a small slit across the back of the shrimp, inserting your blade about 1/3 of the way through. From here, wipe off the intestinal tract, or what looks like black thread.
Red velvet pancakes. Need I say more? Whenever I hear the words "red velvet" my ears instantly perk up. Cake? Cookies? And this time, pancakes? A friend of mine linked me to this recipe not too long ago and just by glancing at the ingredient list, I could tell this was a must-eat. So I zipped over to the grocery store and stocked up on the necessities. Even though many of the ingredients weren't already lurking in my kitchen, it was well worth it. It was easy to make and difficult to screw up. The end result is moist, fluffy and absolutely irresistible. I wish I could brag that I made all sorts of changes to the recipe, but I didn't change much at all. The full credit goes to a food blog called From Portland to Peonies.

Serves: About 6 Prep time: 20 minutes Cook time: About 10 minutes
Ingredients: 1 cup all-purpose flour 1 teaspoon baking powder 1/2 teaspoon baking soda 1/4 teaspoon salt 3 tablespoons white sugar 2 tablespoons unsweetened cocoa powder 1 large egg, lightly beaten 3/4 buttermilk 1/4 cup sour cream 3 tablespoons unsalted butter, melted 1 tablespoon red food coloring 2 teaspoons vanilla extract Maple syrup or whipped cream (optional)
1. In a large bowl whisk together the dry ingredients first. Add in the egg, buttermilk, sour cream, melted butter, red food coloring, and vanilla extract. Mix until combined.
2. Heat a frying pan or griddle over medium high heat. When hot add non-stick cooking spray, followed by a small scoop of the batter. Wait for the pancakes to bubble, about 2 minutes, flip and cook for a minute or two more. Top with a pat of butter and maple syrup, or whipped cream.
My Notes: Creme fraiche or sour cream? If you're like me, you probably frequent grocery store chains like Ralph's or even Whole Foods. Creme fraiche can be hard to find, so I made these pancakes with sour cream -- and I wouldn't change a thing.
More vanilla and baking soda: I love the fragrant, floral sweetness of vanilla, so in this recipe, I added a little dash extra. I also used extra baking powder to ensure a fluffy yet dense pancake.
Make it dessert: A friend of mine declined the butter and decided to take this treat to the next level. Instead, he added a generous scoop of vanilla bean ice cream. Ice cream makes just about any food better, and these red velvet pancakes are definitely no exception. If you decided to go with ice cream topping, you may want to make your pancakes a tad smaller. The portions will be less filling and ultimately, less guilt-inducing!
It's no big deal. I know. But this little snack came as an epiphany to me when I realized it was 5 o'clock and my friends were going to come over soon. I already had the salami, red wine vinegar, extra virgin olive oil, garlic, and salt and pepper. All I needed was to run to the store to grab a package of basil and carton of mozzarella. I knew a common, no-cook appetizer is skewered grape tomatoes, mozzarella and basil -- but what if you swapped the tomato for salami? I wrapped some basil around a wedge of mozzarella, put a folded slice of salami on top and stuck the combination onto a toothpick. Tasty, but not quite right, that is, until I added the red wine vinegar and garlic...

Serves: 8 skewers Prep time: 20 minutes
Ingredients 2-1/2 tablespoons red wine vinegar 2 tablespoons extra virgin olive oil 1 teaspoon minced garlic (or garlic paste) Salt and pepper, to taste 8 mozzarella balls, or 8 slices of mozzarella cut into 1/2 inch wedges 8 basil leaves 8 slices of salami 8 toothpicks or skewers
1. Whisk red wine vinegar, extra virgin olive oil, garlic and salt and pepper in a bowl. Add mozzarella slices and put aside, to let the cheese marinate in the mixture, about 5-10 minutes.
2. Wrap one basil leaf around each slice of mozzarella. Put one folded slice of salami on top and push skewer or toothpick through.
3. Arrange skewers on a plate, drizzle lightly with extra virgin olive oil, and add a dash of freshly ground pepper.
How to fold the salami: Of course, you can fold the salami any way you prefer. I like to fold the round slice in half, then fold that in half so it somewhat resembles a triangle. I fold the point over, then fold the sides across to form a sort of square.
My Notes: Red wine vinegar vs. balsamic vinegar: The plain combination isn't bad. It's mellow, it's pure -- but it's plain. I first tried these skewers with balsamic vinegar, olive oil and garlic but it didn't taste quite right. I normally love the taste of balsamic vinegar but I found it to be overpowering in this recipe. I preferred the light tartness of red wine vinegar. It adds a rich, pungent element without drowning out the freshness of the basil and the heartiness of the salami.
Can I use a different deli meat? Certainly! I imagine this recipe would work perfectly with pepperoni. However, because mozzarella and basil are very Italian ingredients, I recommend using meats common of that culture to finish off this appetizer.
This quick little recipe combines three tasty, savory ingredients: prosciutto, basil and French bread. It's light, it's salty, it's herby, it's crunchy. Would more could you want in a finger food? Just be sure to use the freshest ingredients so each one can stand out on its own. Since it's a Martha Stewart recipe, I'll have to admit it's perfect. I didn't change a thing -- the only thing I did differently was use a toaster oven (and write up a simpler ingredient list).

Serves: 4-6 Prep time: 5 minutes Cook time: 10 minutes
Ingredients 12 slices of baguette (1/2 small baguette, cut diagonally into 1/2-inch-thick slices) 2 tablespoons extra-virgin olive oil, plus more for drizzling 1 tablespoon sea salt (or to taste) Freshly ground pepper 24 fresh basil leaves (at least about 1/2 the size of each bread slice) 4 ounces thinly sliced prosciutto (or 12 slices of prosciutto)
1. Lightly brush both sides of each bread slice with oil. Season with salt and a little bit of pepper.
To heat, using an oven: Preheat oven to 400 degrees. Transfer bread to a rimmed baking sheet. Toast in oven until pale golden, about 5 minutes per side. Transfer sheet to a wire rack or plate; let crostini cool completely.
To heat, using a toaster oven: Preheat toaster oven to 300 degrees. Toast bread until pale golden, about 3 minutes per side. Transfer sheet to a wire rack or plate; let crostini cool completely.
2. Place two basil leaves and a folded slice of prosciutto on each bread slice. Drizzle lightly with oil. Season with a little bit of freshly ground pepper.
My Notes: Oven or toaster oven? I'm sure most chefs and many foodies would insist you use a regular oven. But if you have a small kitchen like I do, you probably don't want to heat up that corner of your living space for a few slices of bread. I prefer to use the toaster oven because it uses less energy and the bread heats faster.
What kind of prosciutto? Because this recipe calls for so few ingredients, it's important to make sure you use good quality ones. You could go with a pre-packaged prosciutto but I find those sometimes tend to be a bit slimy. I prefer to use freshly-sliced Canadian prosciutto from the Whole Foods deli. It's definitely not soggy and is quite lean -- just the way I like my prosciutto.
Why freshly ground pepper? Believe it or not, freshly ground pepper tastes different from the more commonly-used coarse grind pepper. Grinding the peppercorns releases their oils and greater flavor. Plus, this fresher variety makes your finished crostini look even more beautiful.
Warning: for chocolate lovers only. This recipe was so easy, so delicious, I mastered it in one try. The result is a sweet, soft chocolate cupcake with a glossy, smooth chocolate ganache top. I'll have to credit Giada de Laurentiis with this one, though I'm proud to say my version has a few substitutes, ricotta cheese and a little extra sugar. Though this cake may take awhile -- about 3 hours total, including prep, cooking and cooling time, it's sure to be a party favorite. The recipe makes at least two dozen treats that your friends won't be able to turn down.

Makes: About 25 Prep time: About 1 hour Cook time: About 1 hour
Ingredients: Cupcakes 5 ounces unsweetened chocolate, chopped 1 cup water 1/2 cup ricotta cheese, at room temperature 2-1/4 cups sugar 1 cup vegetable oil 3 large eggs 1 tablespoon pure vanilla extract 3 cups all-purpose flour (sifted, preferably) 1 teaspoon baking soda 1 teaspoon fine sea salt 1/2 teaspoon baking powder 1 cup semi-sweet chocolate chips
Ganache 1 cup semi-sweet chocolate chips 2/3 cup heavy whipping cream 1 teaspoon vanilla extract 1 tablespoon sugar (optional)
1. Line cupcake pan with paper liners (or arrange foil cupcake wrappers on a baking sheet) and preheat oven to 325 degrees.
2. Combine the unsweetened chocolate and water in a small saucepan over medium-low heat. Stir constantly until the chocolate is melted, about 2 minutes. Cool for 2 minutes. Whisk in the ricotta cheese until the mixture is smooth.
3. Beat the sugar, oil, eggs, and vanilla in your mixer. Stir in the chocolate-ricotta mixture. Then add the flour, baking soda, salt, baking powder, and chocolate chips. Stir until just blended.
4. Transfer the mixture to a large mixing bowl with spout and pour into the cupcake pan. Alternatively, you can use an ice cream scoop or large spoon to add the mixture to your pan. Allow batter to rest for about 10 minutes.
5. Bake cupcakes for 20-25 minutes or until a toothpick inserted into the center of the cupcake comes out with a very thin -- barely visible -- layer of chocolate. Cool the cupcakes completely before dipping in ganache, about 1 hour.
For the ganache: 1. Combine the heavy cream, vanilla extract and sugar in a small saucepan over medium-low heat. Cook until small bubbles appear on the outside edge of the cream. Pour the hot cream mixture in a bowl, over the chocolate chips. Whisk gently until all the chocolate is melted and the mixture is smooth, about 2-5 minutes.
2. Dip the tops of each cupcake in the ganache and transfer to a baking sheet. Place the dipped cupcakes in the refrigerator to set, about 20 minutes. Allow cupcakes to return to room temperature before serving.
My Notes: Mine vs. Giada's: The first time I made this I had trouble finding mascarpone at the store, so I substituted it for ricotta cheese instead. Ricotta is light and airy and creamier than it is cheesy -- three very important elements when baking a goodie. Also, when I was making the ganache and taste-testing it, I felt it wasn't quite sweet enough. I prefer it with a tablespoon of sugar. If you choose to add it too, make sure you add it in the saucepan while you're heating the cream and vanilla in order to make sure the grains are incorporated well.
Why go semi-sweet and unsweetened? The reason it's a good idea to stick with the semi and un-sweetened chocolate is so you can control the level of sugar that goes into your cake. I love sweets just as much as the next person, but there's no greater buzzkill than when you realize you can't finish a cupcake because your teeth start hurting halfway through.
Why let the cupcakes "rest?" I learned this one from Giada! Allowing the batter to sit in the baking pan before popping it in the oven results in puffier cupcakes. This recipe should result in a puffy top so it best holds the ganache -- plus, you want a wider surface for that sweet chocolate casing.
When do I use foil cupcake wrappers? When you don't have a cupcake pan, of course. I only have one cupcake pan so sometimes it's easier for me to use the foil wrappers and arrange them on two baking sheets rather than waiting for my first batch of cupcakes to cool before baking the next one.
What: Macarons Where: Paulette Beverly Hills
Must Order: Rose; caramel

The Verdict: I'll start out by saying that I'll never post a negative review on this site. I figure, if it's not delish, it's not worth writing about. But just how delish are Paulette Koumetz's and Christophe Michalak's macarons? Delish megish, indeed. These little masterpieces had me raving that macarons are the new cupcake.
I didn't know much about macarons before I tasted several different kinds at Paulette, but it was definitely love at first bite. Though they're pretty pricey (individual macarons are $1.60 each; 1 dozen is $19) they're well worth the occasional splurge. These kosher dairy delights are light and airy with the right amount of richness. The exterior has the slightest crunch and the center is perfectly gooey.
I haven't tasted a single one I didn't like but my favorite one was the rose macaron. Fluffy and floury, these little puffs are made with a little bit of rosewater for that unique flavor. Chocolate lovers will enjoy chocolate-stuffed chocolate shells and pistachio aficionados will marvel at the soft, smooth centers of the green macarons. If you want an even sweeter treat, try the caramel, which has a sugary, sticky filling.
In seeking out new, tasty recipes, you'll probably find that constantly whipping up rich and creamy foods gets old pretty fast. Sometimes you just want something a little lighter, and this spinach and ricotta-parmesan stuffed shells is just the meal. I'll admit, it requires a considerable amount of prep and cooking time, but it's got plenty of easy-to-use ingredients that make the time whiz by. I found this recipe on EatingWell.com, but added extra ingredients here and there to achieve the tomato-laden, cheesy goodness of a gourmet baked pasta.

Serves: 6-7 Prep/cook time: 1.5-2 hours
Ingredients: 24 jumbo pasta shells, (8 ounces) 2 teaspoons extra-virgin olive oil 2 onions, finely chopped 2 pounds fresh, trimmed spinach, or two 10-oz packages frozen chopped spinach, thawed 2 cups part-skim ricotta cheese 3/4 cup freshly grated Parmesan cheese, divided 1/4 teaspoon ground nutmeg 1 large egg white, lightly beaten 4 cups prepared marinara sauce, or two 8-oz jars 1 cup plain dry breadcrumbs Salt and pepper, to taste Optional: 1 can diced tomatoes with 1 teaspoon of sugar (if you want more marinara sauce)
1. Preheat oven to 375 degrees. In the meantime, boil water for your pasta, and be sure to add a few tablespoons of salt just before you drop the pasta shells in. Cook shells until al dente. Drain and rinse under cold water. Set aside.
2. Heat oil in a nonstick skillet over medium-high heat. Add chopped onions and cook until softened, about 3 minutes. Then add the spinach and toss to mix well, seasoning with a pinch of salt and pepper. If you're using fresh spinach, be sure to drain the excess moisture after you've washed and trimmed it. Then add it in batches, adding more as the cooked spinach wilts. Let cool and set aside.
3. Mix all the ricotta, breadcrumbs, 1/2 cup Parmesan and nutmeg in a bowl. Add your cooked onions and spinach and season with salt and pepper. Stir in egg white.
4. Stuff each the reserved shells with a generous 2 tablespoons of your cheesy-and-veggie filling.
5. Spread 1 1/2 cups marinara sauce at the bottom of a 9-by-13-inch baking dish. Arrange the stuffed shells in a single layer. Top with the remaining 2 1/2 cups of the sauce and sprinkle with the remaining 1/4 cup Parmesan cheese. Bake until the top has a nice, golden crust, about 30-35 minutes. Let cool for a few minutes before serving.
My Notes: Mine vs. EatingWell's: EatingWell has a ton of really great recipes -- you can search by low-sodium, low-carb, heart-healthy, you name it, it's there -- but some of them are too dry for my liking. I prefer pasta with a rich, hearty marinara sauce, and with the sharp, salty bite of Parmesan cheese. I added extra of both, and made sure to season my onion and spinach with salt and pepper. I also used more breadcrumbs for more crunch.
More marinara? If you really can't get enough marinara sauce, try adding a small jar of diced tomatoes to the mix. Make sure you counter the bitterness of the tomatoes with a teaspoon of sugar. A whole extra jar of prepared sauce is too much as it isn't likely to fit in your baking dish and would drown out the taste of the cheese.
Homemade dinner? Who actually has time for that these days? No matter the situation -- whether you work full-time, go to school full-time or take care of kids full-time -- there's always an excuse to grab the takeout menu and order your usual chicken teriyaki with brown rice. But this salmon recipe, adapted from Simply Recipes, may well be the quickest, easiest fish you'll ever make. Just 10 minutes of prep time (5 minutes, once you've mastered it!) and pop this sucker in the oven for several more minutes. It's so simple that if you mess up the ingredient proportions, you still wind up with a delicious baked salmon. It's healthy, it's elegant and it's oh-so-tasty.

Serves: about 4 Prep time: 5-10 minutes Cook time: 12-14 minutes
Ingredients: 1 slab of thickly cut, boneless salmon 2 tablespoons olive oil 4 tablespoons honey mustard dressing 2 tablespoons thyme (preferably fresh; I just used dried) 2 tablespoons parsley Salt and pepper to taste 2/3 cup panko bread crumbs
1. Preheat your oven at 400 degrees. Place the salmon on a lightly greased baking sheet, skin side down. Season with salt and pepper.
2. Whisk together the olive oil and honey mustard. Add thyme and parsley (keep whisking!)
3. Spoon mixture onto the salmon, making sure it's spread (at least somewhat) evenly. Sprinkle with a little more salt and pepper then finish it off with the panko on top.
4. Bake for 12-14 minutes, until the panko bread crumbs are a light golden brown and/or the salmon flakes when poked with a fork.
My Notes: Mine vs. Simply Recipes'. I first made this fish when all I had in my pantry was panko and a bunch of dried herbs. All I needed from the store was the honey mustard and salmon. I went ahead and bought honey mustard dressing (rather than the actual condiment) because I knew I could keep it in my fridge for a long time and use it to flavor homemade salads. I didn't bother buying paprika since I rarely cook with it; its absence also helps the thyme and parsley stand out on their own. As for the ingredient proportions, I felt the original recipe was a bit dry and bland. A few tablespoons more of honey mustard gives it the tangy, savory kick and the extra drizzle of olive oil helps the salmon stay moist.
Not too long ago, I tried this recipe with honey mustard (rather than just the dressing) and I definitely wasn't pleased with the results. The salmon ended up being more bland, and I realized the dressing complements the herbs much better.
What's panko? Panko is a Japanese bread crumb. The little, light yellow flakes have less sodium and carbohydrates than regular bread crumbs. You normally see it on tempura, and you can use it when making just about any food that requires breading. Best of all, panko is really easy to work with because it stays on food and it doesn't burn easily.
I’m actually not the biggest fan of mousse. It’s usually too chocolate-y or too bland, too soft or too sweet. Too something. But this recipe, taken straight from the Food Network’s Giada De Laurentiis herself, has just the right consistency – and with a few of my own tweaks, just the right level of sweetness. It’s super easy and best of all, it doesn’t require any cooking.

Serves: about 10 Prep time: 20-25 minutes
Ingredients: 2 cups whole milk ricotta (or 1 15-ounce container) 3/4 cup of strawberry preserves or jam (can be substituted for your favorite preserves or jam) 1 cup heavy whipping cream 1/4 cup powdered sugar
1. 1 cup of strawberries (or the same kind of fresh fruit as your jam) Either in a food processor or mixer, blend the room temperature ricotta cheese until it’s smooth and fluffy (usually about 30 seconds in a food processor, or 1 minute in the mixer). Add the jam and blend until combined, about several seconds until you get that nice, light pink color. Transfer to a large mixing bowl.
If you’re like me and your kitchen appliances are both small and limited, you’ll probably need to wash and dry your mixer. You’re going to whip the cream, so you’ll want to make sure you have a clean mixer to make sure the cream becomes the right consistency.
2. Beat the cream on medium-high speed until thick, about 5 minutes. Add the powdered sugar and crank up the speed. Blend until the cream holds stiff peaks, about 5-7 minutes longer.
3. Fold (or gently mix) the whipped cream into your ricotta-jam mixture in small batches.
4. Refrigerate 1 hour prior to serving. When ready, use an ice cream scoop to plop a generous portion onto your serving bowls. I use one hefty scoop per serving. Garnish with your fresh fruit and enjoy!
My notes: Mine vs. Giada’s. When I first whipped up this dessert, I followed Giada’s recipe down to the last measurement. While I was happy with the texture, I felt the end result was a bit too ricotta-y and not quite sweet enough. I like a little extra jam and powdered sugar.
Which jam? Giada’s original recipe actually calls for raspberry jam. I’ve also seen this made with blueberries! Feel free to use whichever preserves or jam you like – it’s probably a good idea (for your wallet!) to choose one that’s on sale. Just don’t use jelly! You want the full-bodied taste of real fruit, and that’s a taste you get only from preserves or jam.
Why whole milk ricotta? For a more calorie-friendly treat, you could go with skim milk ricotta. I just prefer using whole milk to get a richer flavor and that perfect mousse-y texture. Also, when you’re making recipes with so few ingredients, it’s important to make sure they’re good quality. Using fewer ingredients means you can’t hide the tastes of cheap items!
Why powdered sugar? Powdered sugar is much lighter than granulated, so it incorporates into the cream much more smoothly. It also gives the cream a tiny bit of weight that lets it puff up. That way, you get a fluffy whipped cream that’s perfectly smooth.