Parmesan Garlic Truffle Fries
My heart skips a beat whenever I hear the three words, "parmesan", "garlic" and "truffle" in one sentence. Follow those by the word "fries" and my brain just about implodes.
Read MoreFood. Drink. And all the things!
My heart skips a beat whenever I hear the three words, "parmesan", "garlic" and "truffle" in one sentence. Follow those by the word "fries" and my brain just about implodes.
Read MoreI was craving this sandwich every day of the week. After one or two queries, an heirloom tomato and a handful of garlic later, I had my recipe. This Portobello mushroom burger is super juicy and oddly enough, feels really meaty. And yes, friends, you can make this too.
Read MoreThis Chinese shrimp dish has everything I always look for in an entree: it's crispy, salty, juicy and spicy. And -- I'm very proud to say -- I prefer this recipe over most Chinese restaurants' dishes. The addition of Szechuan peppercorns sends it over-the-top mouthwateringly-spicy.
Read MoreRecently, I had the most difficult final during my time at Le Cordon Bleu in which I had to make an amuse bouche, appetizer, and entree. So I went with a Peruvian-inspired dish: citrus-marinated grilled chicken with a side of cilantro rice and tostones, or twice-fried green plantains.
Read MoreI'll admit it -- I was always nervous about cooking plantains because it's a common mistake to overcook them. But in this recipe, green plantains are twice-fried, so it can be made in a pinch.
Read MoreThis recipe is a fun, flavorful take on traditional rice. It has fresh cilantro, and packs a nice kick from garlic and cumins. Serve it with chicken or beef or your favorite protein.
Read MoreI'll admit it: I'm lazy. Although I try to be mindful to give ingredients the time and respect they deserve, I also try to cut corners whenever possible. This means blanching all my veggies in one pot -- regardless of color (and yes, I've blanched a whole beet, potatoes and peas all in one pot and had no trouble at all), and periodically reaching for the can of crushed garlic in my refrigerator (but don't tell anyone that shameful secret!). So I figured it only makes sense that I'd "cheat" my way through a potato chip recipe. Ordinarily, one would fry these in a big pot, but I try to bake rather than fry whenever possible. Usually, you can just leave the food in the oven and forget about it temporarily. Plus, it's healthier. When making potato chips, you have to slice the potatoes very thinly, about 1/8 of an inch. You may be able to do this with your trusty chef's knife, but I prefer to use a mandoline. It's much faster and more accurate. Just be careful you don't shave your fingers!

Serves: 4 Prep time: 5-10 minutes Cook time: 20-25 minutes
Ingredients: 2 large Russet potatoes 3 tablespoons olive oil kosher salt and pepper
1. Preheat oven to 400 degrees.
2. Wash and scrub the potato. Leaving the skin on, slice into 1/8" rounds.
3. Soak the slices in a bowl of water for a few minutes to rinse some of the starches off. Dry with paper towels.
4. In a clean bowl, toss the potato slices in olive oil. Arrange in one layer on a silicon baking sheet mounted on a sheet pan.
5. Sprinkle generously with salt and pepper. Bake for 20-25 minutes, or until the edges are golden brown. Sprinkle with salt again.
My Notes: Can I use additional seasonings? Of course! Be creative! When the chips are done baking, try sprinkling some cayenne pepper (for a spicy kick) or grating some Parmesan cheese over the top (because who doesn't love cheese?).
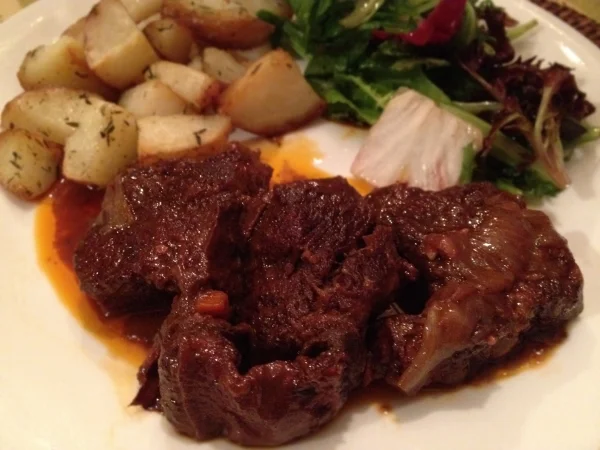
We all have that go-to meal, that must-order at restaurants. Some people order a burger wherever they go. Others might rely on a juicy rib-eye steak. For me? It's braised short ribs. Whenever I see this on a menu, it's precisely what I order. How can you not want succulent meat that literally falls off the bone when you poke it with your fork? And that delicious pan gravy? Heaven.
The other day I was craving this dish and for the first time, decided to make it myself. A few Google searches and six recipes later, I settled on the recipes I was going to work off of - Wolfgang Puck's and Anne Burrell's.
Typically in French cooking, carrots, onion and celery are used for seasoning sauces. Once the cooking process is done, they're discarded and the sauce is strained (as is the process with Puck's recipe). I've always taken issue with this; sure, I like smooth sauce, but I feel tossing out the veggies is a waste of food. So I kept them in my recipe and decided to call it "country-style." Bon Apetit!
Serves: About 6 Prep time: 20-25 minutes Cook time: 3-3.5 hours
Ingredients:
1. Pour the wine into a large saucepan over medium heat. Allow it to simmer until it cooks down by 1/2. Remove from heat.
2. Center a rack in the oven and preheat oven to 350 degrees.
3. Heat the oil in a large pot - large enough to hold all the ribs - over medium-high heat. Generously season the ribs all over with salt and pepper. When the oil is hot, sear the ribs on each side until well-browned, about 3-4 minutes.
4. Transfer the browned ribs to a plate. Lower the heat to medium, and toss in the shallots, carrots and celery. Brown the vegetables lightly, about 5 minutes. Stir in the garlic and tomato paste and cook, about 1-2 minutes. Season with salt and pepper.
5. Add the reduced wine to the vegetables, scraping the bottom of the pot with a rubber spatula or wooden spoon. Add the ribs back to the pot, then add the thyme and bay leaves. Cover with beef stock. Season with salt and pepper. Bring to a boil; tightly cover the pot with foil, and place into the oven to braise for 2 hours.
6. Taste the braising liquid and season with additional salt and pepper, if necessary. Move the ribs around. Add the potatoes to the pot. Cover with foil again, and place back into the oven for 40 minutes, or until the ribs are tender enough to be easily pierced with a fork.
7. Remove the thyme and bay leaves. Check the consistency of the sauce. If you like it as is, let the meat rest in the pot for 10 minutes before serving. But if you'd like a thicker, gravy-like consistency: In a small bowl or cup, mix together 2 tablespoons cornstarch and 2 tablespoons water until the cornstarch is dissolved and the mixture looks like milk. Pour into the pot of sauce/ribs, over medium heat. Stir well until sauce is thickened, about 2-3 minutes.
My Notes:
More tomato paste: After some thought and a trip to the grocery, I ended up adding more tomato paste than Wolfgang Puck's recipe calls for, and less than Anne Burrell's. I thought Burrell's recipe called for too much -- I didn't want braised tomato ribs. On the other hand, the smallest quantity of tomato paste available at the grocery was a 6-ounce can. For the sake of simplicity, I used the whole thing. The tomato flavor was present but not overwhelming.
More substantial with potatoes: I wanted my dish to be a balanced full meal. Typically, braised short ribs would be served with mashed potatoes, but I wanted to combine textures of melt-in-your-mouth meat with soft, chunky potatoes.
Why is this sauce chunky? Traditional French cuisine would see the carrots, shallots and celery being discarded. And because I wanted a well-balanced, hearty dish, I left mine in. If you wanted to make this dish more traditionally, you can discard them and strain your sauce before ladling onto the meat.
What other kinds of wine can I use? Dry! I like cooking with Cabernet Sauvignon -- it's strong, dry and my favorite kind of wine. (I always pour out a few ounces to sip on while I cook!) But don't go out of your way to get an expensive bottle. A $6 bottle will do just fine. You can also use Burgundy wine. Merlot and Syrah might work, but often, these wines are too mellow for a sauce like this.
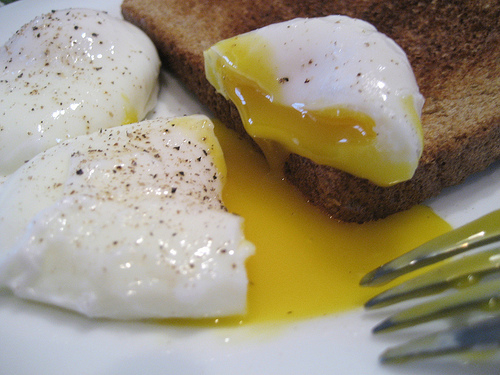
The thing about poaching eggs is that it sounds more complicated than it actually is. When you do a quick Google search, you get links to various how-tos and videos that involve separate tiny dishes, taking the temperature of the water, whirpools -- all things that make the process seem daunting. But all you really need is a small saucepan, a dash of white vinegar, an egg, and a slotted spoon.
1.Heat water in a saucepan. Either wait for tons and tons of tiny bubbles form in the water (with no rapid agitation at the surface) and lower the heat. Or, even simpler, bring your water to a boil and when that happens, turn the heat down to very low and wait a few seconds until the water stops bubbling rapidly.
2.Add a dash of white vinegar. There's no need to measure this out, though if you really wanted to, about 2 teaspoons is fine. The vinegar helps bind the yolk together, keeping the egg from falling apart.
3.Break the egg into the water. Crack the egg on a hard, flat surface and crack it open just above the water, releasing it into the lightly simmering pan. It's important to do this just over the water's surface so it doesn't splash back up at you.
4. Wait 3 minutes. Set your oven timer to three minutes and gently take out the egg with the slotted spoon. You'll know the egg is done because it'll turn opaque. Plus, three is the magic number; you'll get a slightly thick, runny yolk.
It's that simple. You don't need to crack the egg into a small dish and then pour it into the water -- it won't result in a neater egg, and you'll end up with an extra dish to wash. You don't need to create a "whirlpool" -- it won't result in a neater egg, and you'll end up stressing over when to pour in the egg ad the opportune moment.
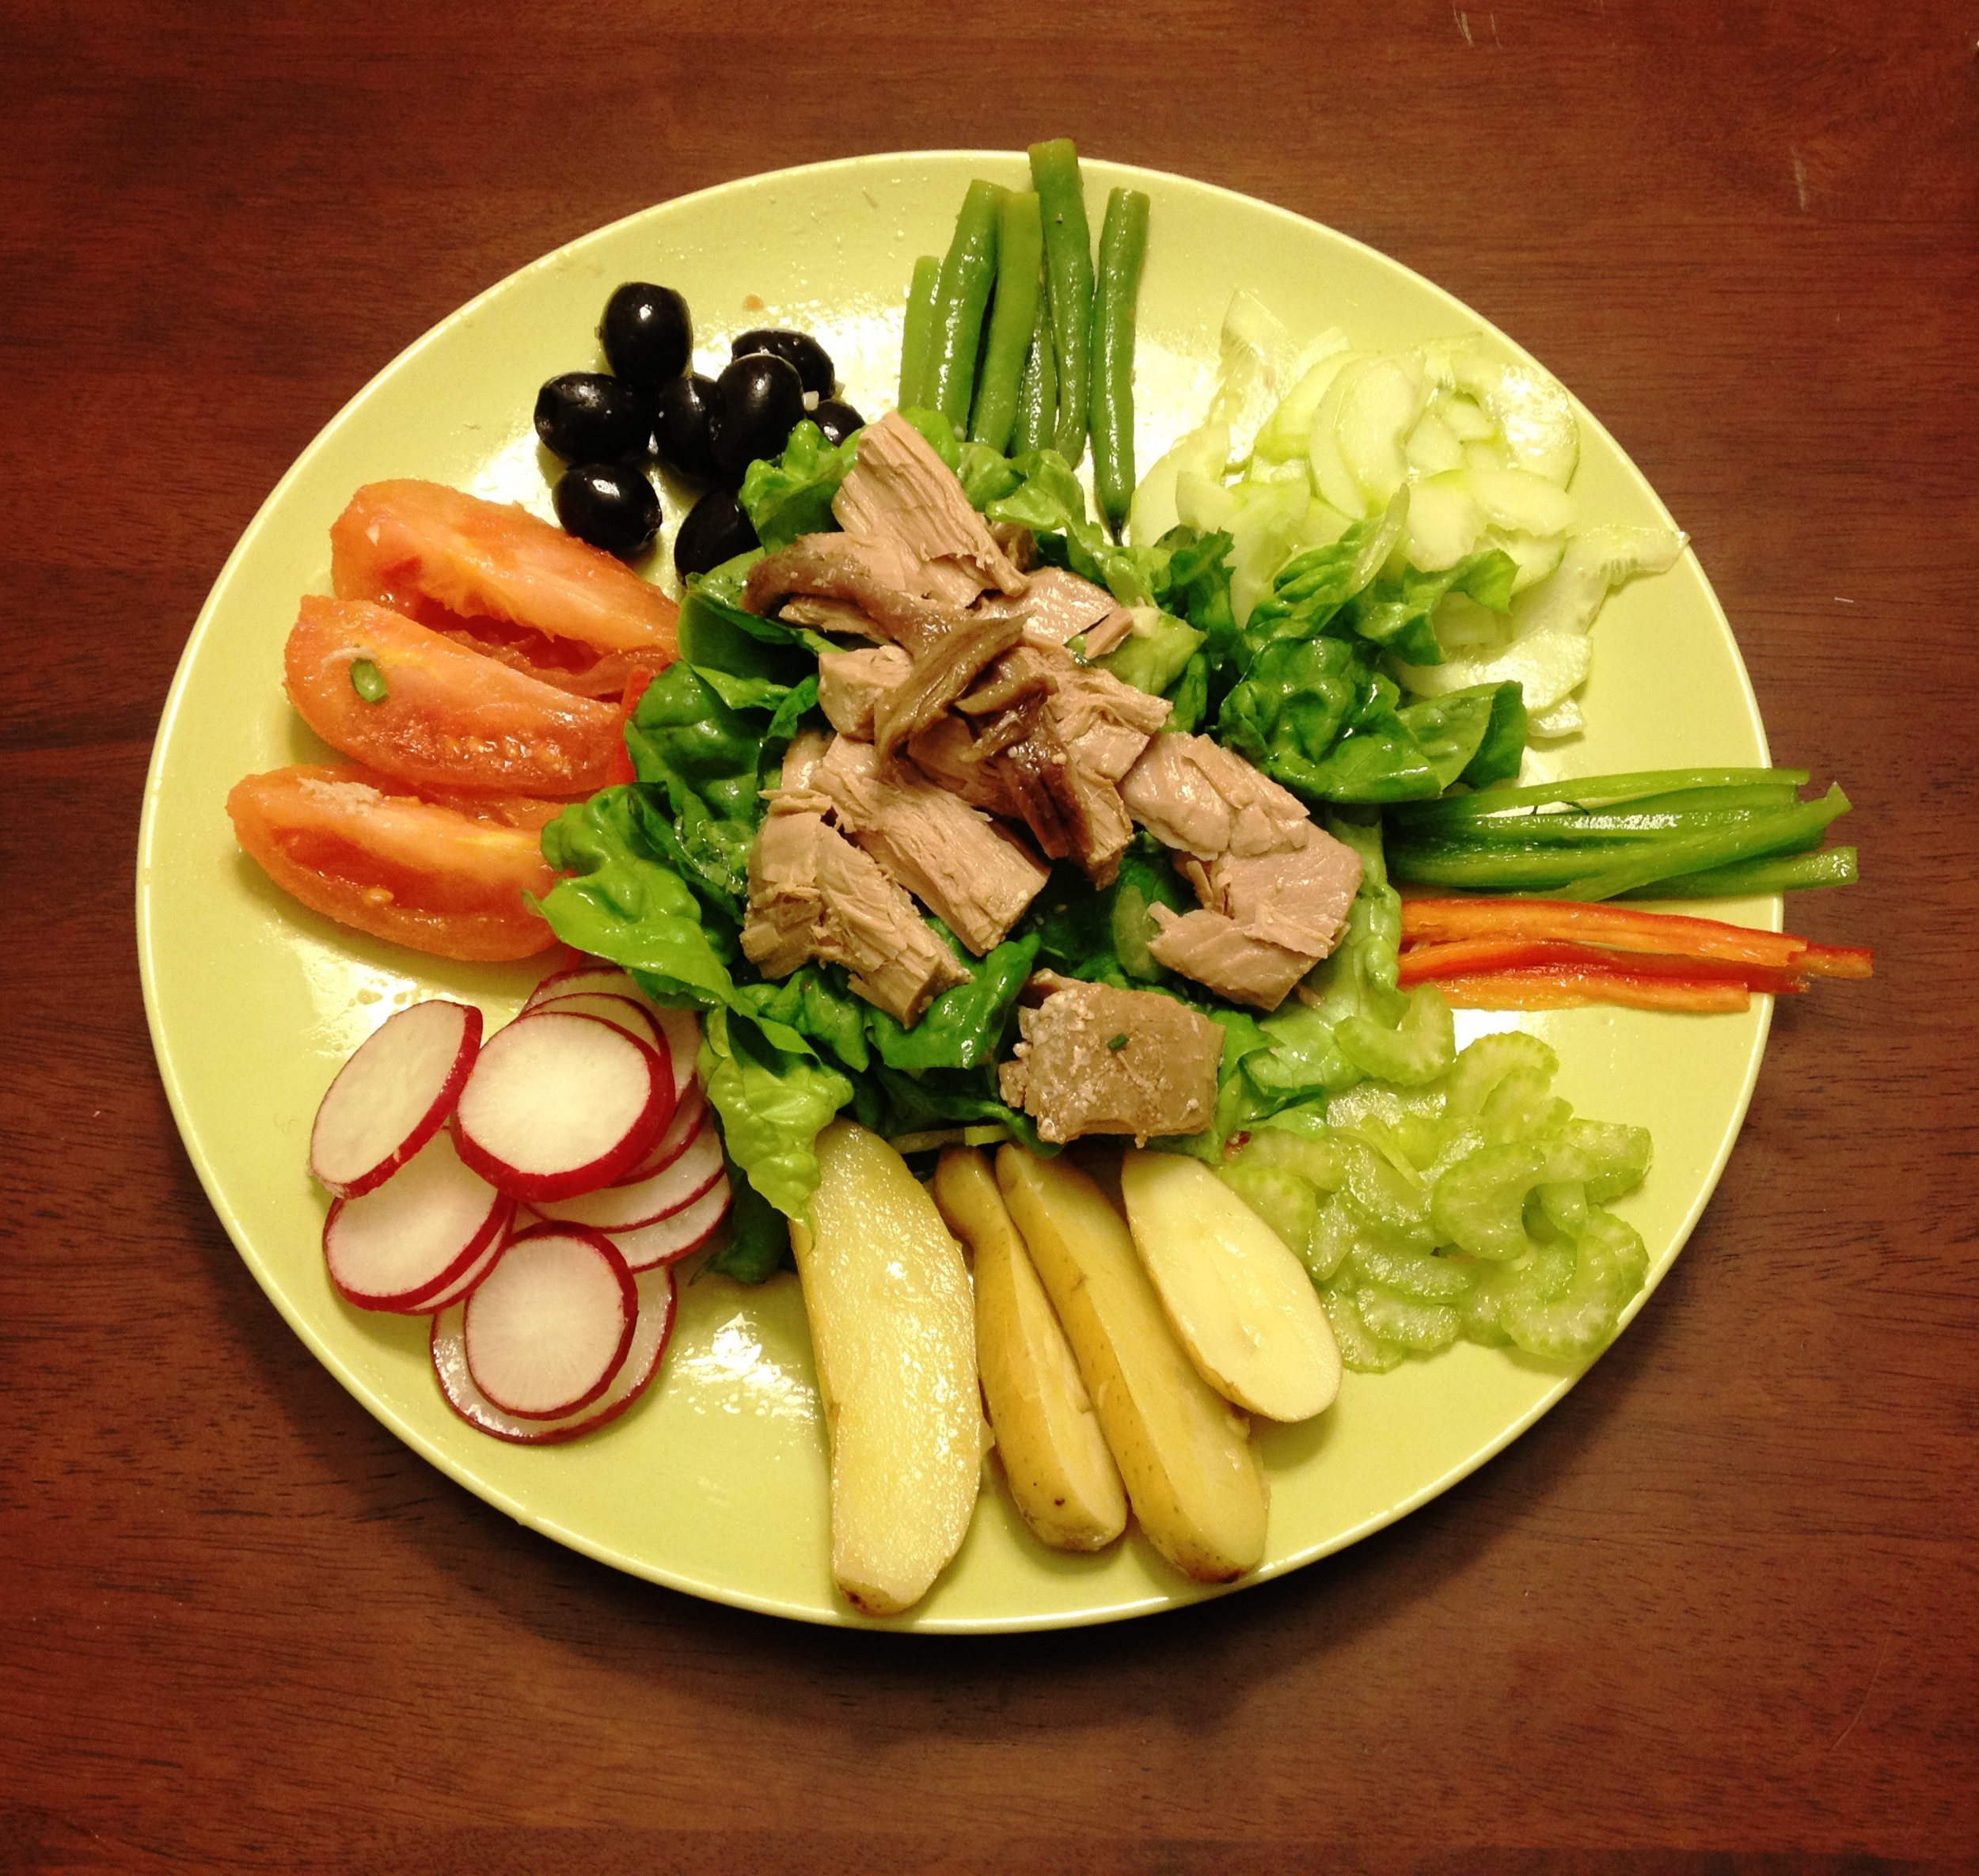
I've actually had this recipe in my arsenal for a few months now, but I hesitated to post it here on DelishMegish. There are several steps involved as some ingredients are cooked and some are left raw. But I realized it's too good not to share. It's colorful, textural, substantial -- everything you need and want in a salad meant as an entree.

Serves: 1 Prep time: About 30 minutes
Ingredients: 4 ounces tuna steak 1 cup extra virgin olive oil 1 bay leaf 2 sprigs rosemary 1/2 - 3/4 head of Boston lettuce 2" cucumber, peeled and seeded, thinly sliced 2" celery stalk, thinly sliced 1/4 red bell pepper, thinly sliced 1/4 green bell pepper, thinly sliced 3-5 blanched green beans 3 fingerling potatoes 2 radishes, thinly sliced 4 olives, whole 2 anchovies 1 hardboiled egg, quartered long-ways
For the vinaigrette: 1 tablespoon red wine vinegar 1/4 teaspoon Dijon mustard 1/4 cup olive oil 2 cloves of garlic, finely chopped
1. Poach tuna: Heat olive oil in a sauce pan, with bay leaf and rosemary. When very few bubbles form, add tuna and poach until fully cooked, about 10-15 minutes, over low heat.
2. Cook some of the vegetables: Fill a small sauce pan 3/4 with water. Add fingerling potatoes and turn heat to medium-high. Let water come to a low rolling boil, allowing the potatoes to cook through, about 15-20 minutes. When water starts boiling, add green beans to cook, about 3-5 minutes. Then add whole tomato, about 1-2 minutes.
3. Hard boil the egg: In a sauce pan, cover egg with water. Bring to boil. Reduce to low simmer for 11 minutes. Take out egg and place in cold water. When cooled, peel and slice lengthwise into quarters.
4. Wash the raw vegetables: Rinse the lettuce, radishes, cucumbers, celery and bell peppers. Pat dry with paper towel and set aside.
5. Make vinaigrette: Whisk together the red wine vinegar and Dijon mustard. Add garlic. Slowly pour in the olive oil, whisking continuously.
6. Peel tomato and slice lengthwise into quarters. Slice fingerling potatoes in half. Trim green beans. Toss all into the vinaigrette. Toss lettuce as well.
7. Thinly slice (about 1/4") radishes, peeled and seeded cucumber, celery and bell peppers. Radishes should be left round. Cucumber and celery should be sliced width-wise. Bell peppers should be sliced into thin strips.
8. Mound lettuce in the center of plate. Arrange vegetables (tomato, fingerling potatoes, green beans, radishes, cucumber, celery, bell peppers, olives) and around it.
9. Gently break up the tuna and toss in vinaigrette. Put on top of lettuce. Criss cross anchovies on top.
My Notes Why cook only some of the vegetables? I think the potatoes are self-explanatory -- raw potatoes are gross. Plus, your body can't digest all that starch. Green beans, though safer than potatoes to eat raw, contain a toxin that causes gas or even nausea, vomiting and diarrhea. As for the tomatoes, it's mainly just French tradition to cook them quickly. Doing so also renders a bright, sweet flavor.
Kale chips -- they're delicious! I swear! Lately, I've been keeping an eye out on healthy meal choices (hence my recipe for a Green Smoothie) partly because of the disapproving looks I get from my boyfriend whenever I bury my face in a bag of Tapatio-flavored Doritos ("You're not better than me!" I cry as I return to my chips, sinking into a spiral of shame), and partly because of the super-yummy but rich and fatty dishes I've been learning to make at culinary school. I had been hearing about these crispy kale chips for awhile now. Heck, just about every food blogger has a recipe. (I'm partial to the one from For The Love Of Food, mostly because of the pictures.) I was excited to try them out, but didn't have particularly high expectations because, to me, nothing can ever replace Doritos... or Flamin' Hot Fries. And wow. Wowowow. Delish. Megish. Indeed. They're really crunchy, super light, savory, earthy, salty, nutty. These aren't lame diet bagel chips. Or bland, unsalted raw nuts. These are the real deal potato chip alternative. Without further ado, the recipe for baked kale, oven-roasted kale, crispy kale, kale chips -- whatever you want to call them:

Serves: 2 Prep time: 2-5 minutes Cook time: 10-15 minutes
Ingredients: 1 bunch kale (the curly kind, about 4-5 stalks) 1 tablespoon olive oil 1/2 teaspoon salt Cayenne pepper (optional)
1. Preheat oven to 350 degrees. Start with dry kale. Otherwise, they'll turn out soggy. Either wash the stalks hours beforehand, or pat to dry and make sure there's no visible moisture. Rip leaves off stalks.
2. Toss in olive oil. The kale shouldn't be fully covered in olive oil, just a very light coat.
3. Place kale on a baking sheet lined with parchment paper or silicon baking mat. Bake in oven until the leaves' edges brown slightly, about 10-15 minutes. My oven tends to run a bit on the hotter side, so I bake mine for 10 minutes.
4. Set aside to cool, about 1 minute. Sprinkle with salt and if desired, cayenne pepper.
My Notes: What if I overcook the kale? Hey, it happens. It'll have a bitter, burnt flavor. Be sure to check your kale at the 8-minute mark. When the curly edges look brown, they're done. They should have a light, crispy, papery texture.
Can I use cooking spray instead of olive oil? You sure can! Some might say this would be a fewer-calorie-alternative. I just tend to shy away from foods that come in spray cans. It's a personal bias. Plus, I like the vaguely fruity, clean taste of olive oil.
Can I use other seasonings? Yes! The sky's the limit. When I'm in need of a spicy snack fix, I dust on some cayenne pepper. If you're introducing this recipe to a reluctant friend, try sprinkling on some freshly grated Parmesan cheese.
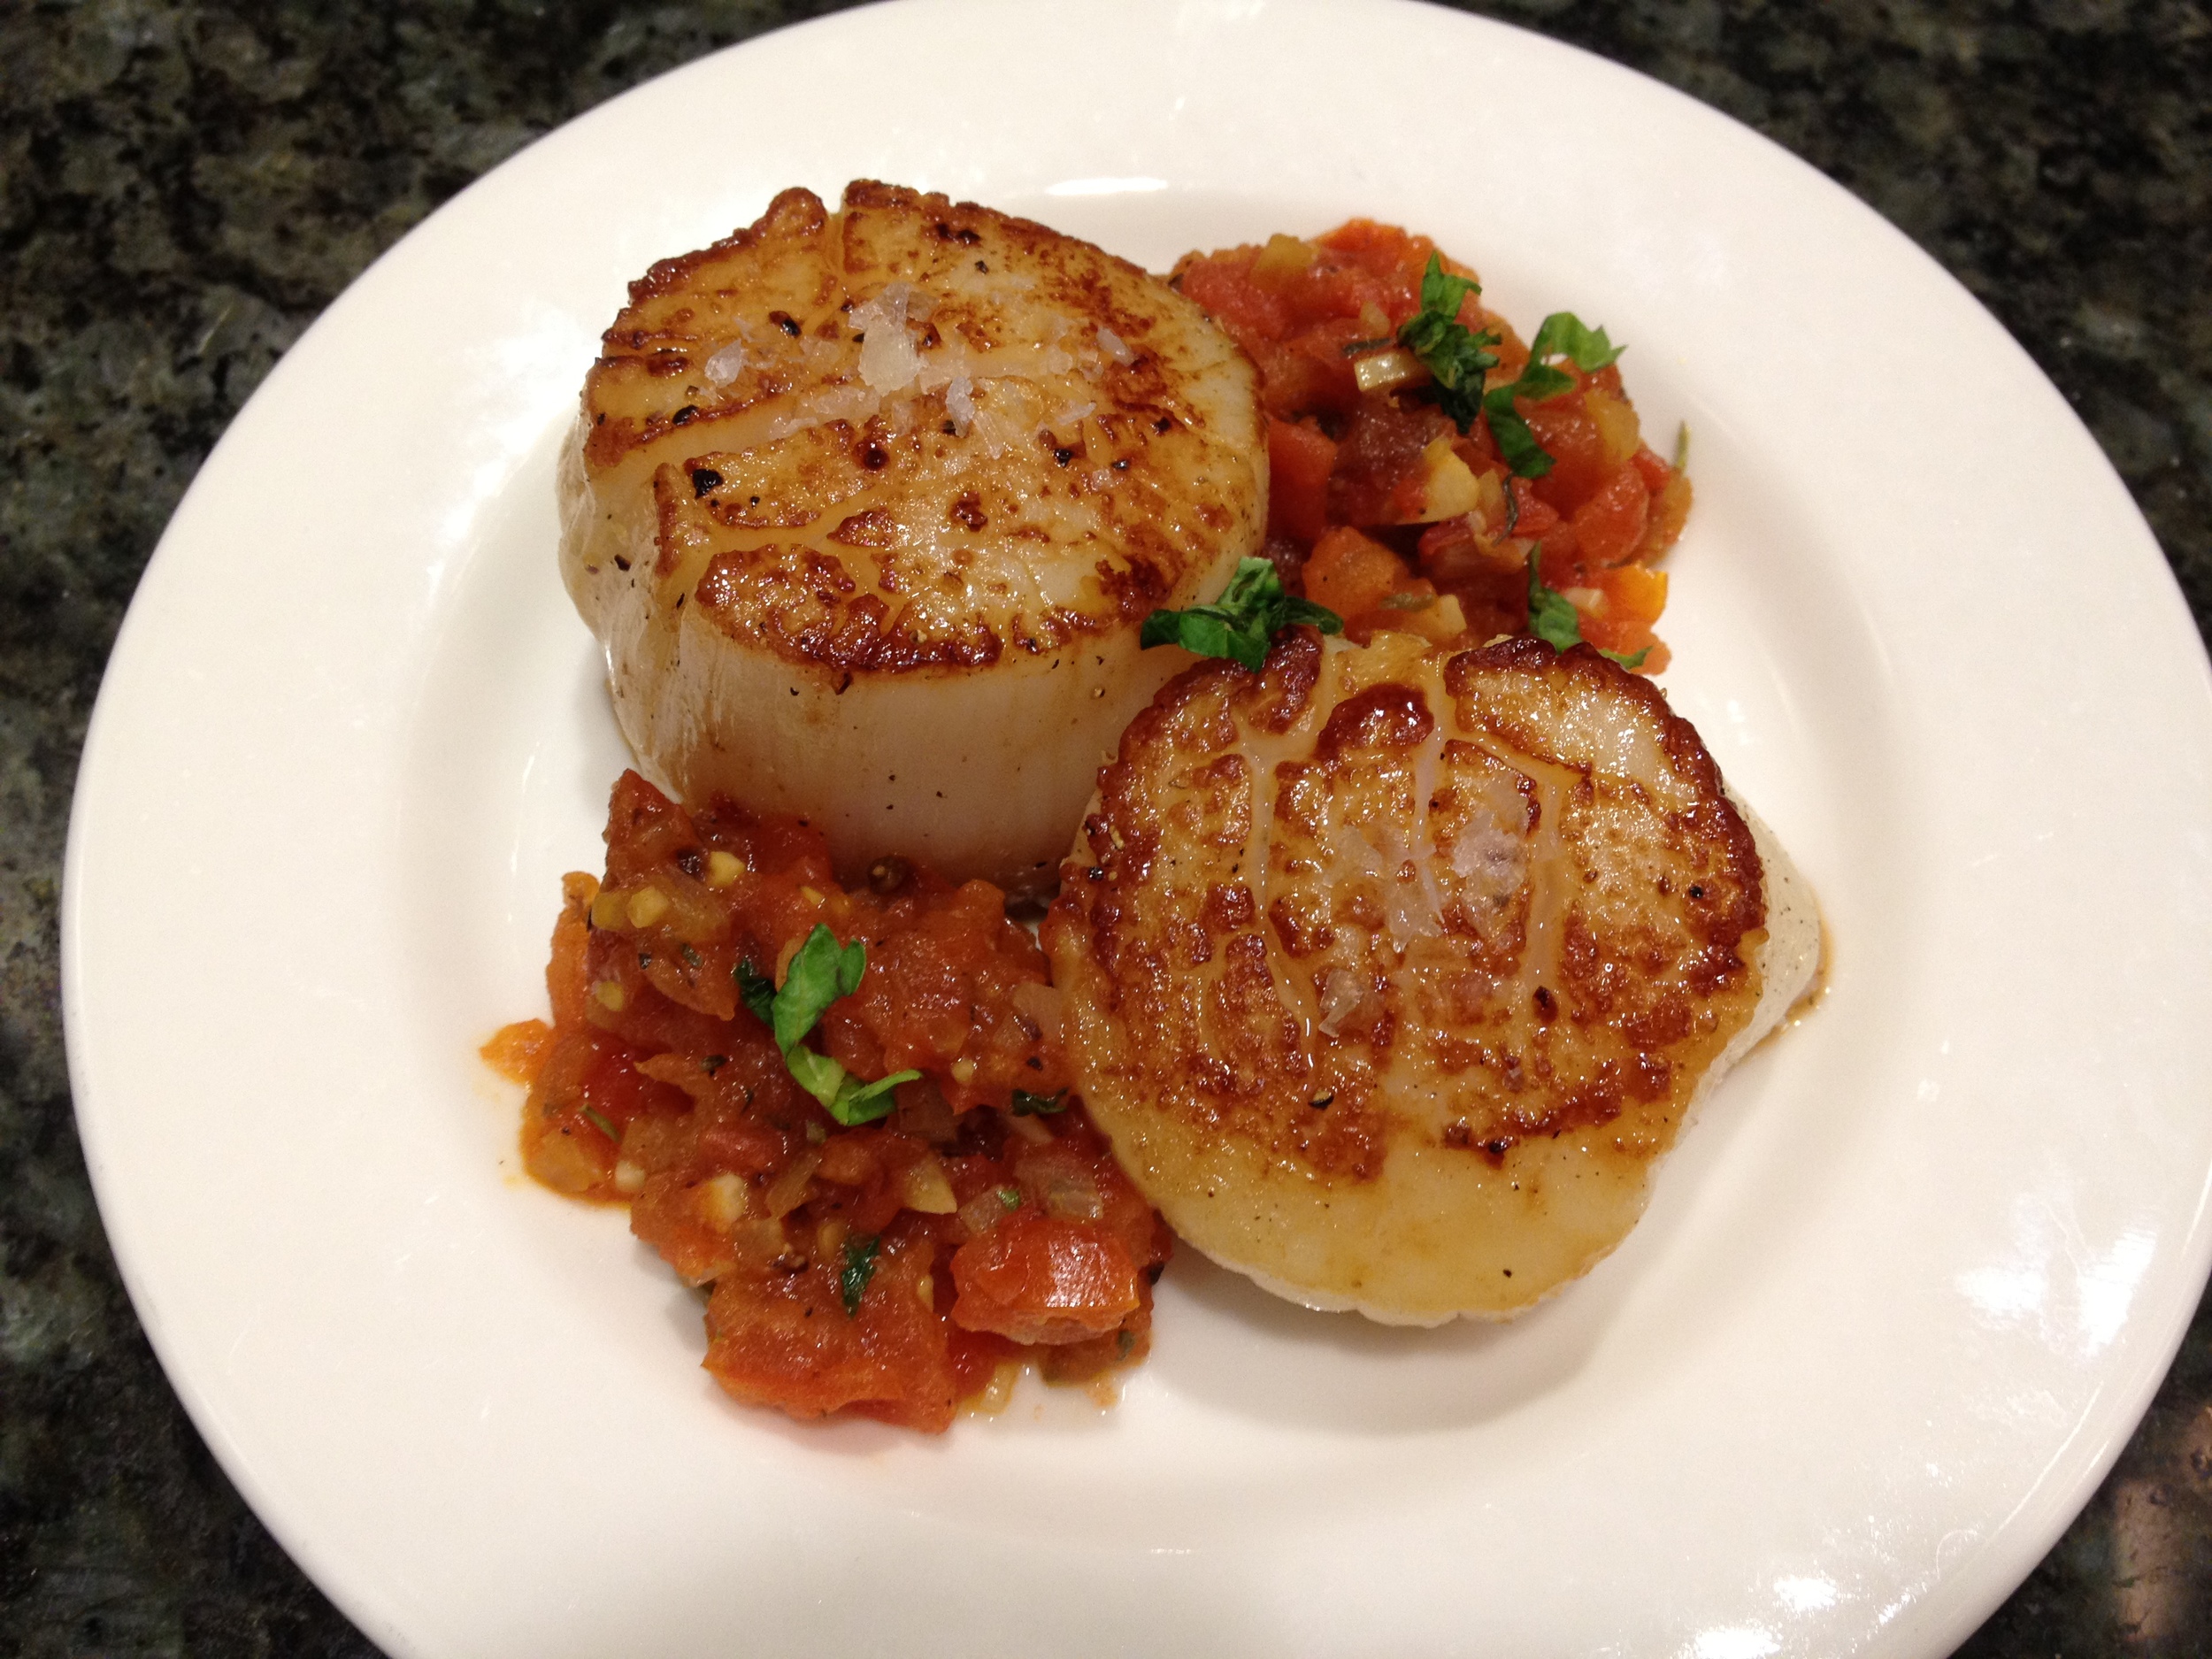
Scallops can be tricky. Leave it over heat an extra few seconds and you get stuck with little balls of rubber. But when you cook them just right, you have a lovely, succulent treat. This classic French appetizer, also known as Saint Jacques Provencales, includes a light and tart but savory tomato sauce that complements the simply seasoned scallops.

Serves: 4 Prep time: 5-10 minutes Cook time: About 15 minutes
Ingredients: 8 scallops (2 scallops per serving) 1 tablespoon olive oil 1.5 shallots, finely chopped (or about 3-4 tablespoons) 2 cloves of garlic, finely chopped 2 tomatoes, chopped 1/4 cup chicken broth 1/2 teaspoon dried thyme 1 teaspoon dried oregano 4 sprigs of parsley, finely chopped Coarse salt and white pepper
1. Rinse scallops with salt water and pat dry. Season both sides with salt and white pepper.
2. Prepare vegetables for the sauce: finely chop the shallots and garlic. Chop the tomatoes.
3. Heat saute pan over medium heat. Add oil. Sear scallops on each side until light golden brown, about 2 minutes on each side. Wrap in foil to keep warm and set aside.
4. Turn the stove down to low-medium heat. Add shallots and cook until they start to soften, about 3 minutes. Add the garlic, tomatoes and chicken broth. Add thyme and oregano. Season with a pinch of salt and white pepper. Let simmer until sauce looks mostly chunky but still wet, about 5-7 minutes.
5. Prepare the garnish: Finely chop parsley and set aside.
6. To serve: Place two scallops and a heaping tablespoon or two of tomato sauce on a small plate. Add a few coarse salt crystals to the top of the scallops. Garnish with parsley.
My Notes: How do I know I cooked the scallops correctly? Put short, undercooked scallops will be mushy. Overcooked scallops will be tougher or rubbery. Be mindful of the color of both raw and properly cooked scallops. Raw scallops will look translucent. But when they're cooked they'll look more white and opaque.
Why should I heat the pan before adding the oil? It's a simple little trick to help keep the scallops from sticking to the pan.
Red meat thrown on a grill. Red wine mixed into butter. That's all it really is. But if you want the fancy French name, it's côte de bœuf with beurre marchand de vin. It's a thick, bone-in rib eye steak (a.k.a. a Tomahawk steak) seared on the grill (for that gorgeous, caramelized outer crust) and finished in the oven (for a perfect medium-rare), topped with butter mixed with Cabernet Sauvignon. The result? A juicy steak with a crispy, salty, peppery outer layer balanced with the rich acidity of the compound butter. Make this at home and pat yourself on the back for being able to grill a steak comparable to your city's best steakhouse.

Serves: 4 Prep time: 10-15 minutes Cook time: 30-35 minutes
Ingredients: 4 rib eye steaks (thick cut, bone-in) Coarse salt Black pepper
For the butter: 1 stick unsalted butter, room temperature (must be soft so it's easy to mix) 2-3 ounces Cabernet Sauvignon (or about 5 tablespoons) 1/4 shallot, finely chopped (or about 1 tablespoon) 1-2 sprigs parsley, finely chopped (or about 2 teaspoons) 1 teaspoon lemon juice Salt/pepper, to taste Plastic wrap
1. Preheat oven to 350 degrees.
2. Mix the red wine, a little bit at a time, into the softened butter until the mixture is pale pink. Add the shallots, parsley and lemon juice, and a pinch of salt and pepper. Put the mixture onto a sheet of plastic wrap, forming into a log. Roll it in the plastic wrap, twisting the ends to seal it. (Sort of like a giant Tootsie Roll.) Place in fridge at least 20-30 minutes prior to serving.
3. Heat grill pan on stove. Season the steak generously with coarse salt and black pepper, on both sides. This will create that delicious crust.
4. When the grill is ready, place steaks on in the 10:00 position, over high heat. When grill marks form, turn the steaks to the 2:00 position, about 2 minutes. When grill marks form, flip over at 10:00. When ready, turn to 2:00. (Turning the steak like this ensures you get hatch marks, like this. It also helps ensure even cooking.) At this point, the steak is almost rare.
5. Place steaks in a roasting pan, cover with foil, and put in the oven about 20-25 minutes, for medium-rare steak. The texture of medium-rare steak should feel like the front of your chin; firm but soft. (Tip: Check it at 15 minutes and put back in the oven, as needed.)
6. Remove red wine-butter from fridge. Cut into thin (about quarter-inch) slices, and place 1 or 2 of them on each steak. The heat from the steak will melt the butter.
Want a balanced meal? To feel less guilty about this dish, pair it with a side salad.
My Notes: How do I know when my steak is cooked through? SimplyRecipes has a good finger test to determine the doneness of steak just by poking it. But that's a little too complicated for me. I like my steak a perfect medium-rare, which feels like the front of your chin. Because every grill and every oven is different, it's hard to say for sure whether medium-rare will be achieved at exactly 20 minutes. So it's important to learn how your steak should feel.
Can I use cold steak to start? Preferably, you would use a thawed steak and take it out of the refrigerator 10-15 minutes prior to seasoning and grilling. In essence, cool -- not cold -- steak is ideal. This is to ensure a tender steak.
Why Cabernet Sauvignon for the compound butter? Annoyed that you're opening your decent bottle of Cabernet for this dish? Don't be! Like Alton Brown (and pretty much any chef) says, don't cook with any wine you wouldn't drink. Beef shouldn't be paired with sweet wine, so the dryness of the Cab is perfect. You can drink the rest of the wine when enjoying your meal, while cooking it, or both.
Ah, the panini maker. It's one of those household items you yearn for when you don't have one, yet one that collects dust in the back pantry when you do have one. It's sort of like the backyard swimming pool of kitchen appliances. I'll have to admit, up until the other day, my own panini maker was sitting on top of my refrigerator, lonely and unused. But a recent burst of creativity (and surplus of fresh vegetables) changed that. Here's a fresh and hearty sandwich recipe that you can put together and press into your panini maker within a few minutes. It even includes an easy homemade Dijon-parsley vinaigrette. You can use any meat or cheese you like, but this particular recipe calls for roast beef and gruyere, my favorite deli meat and favorite sandwich cheese...

Makes: 1 sandwich Prep time: 15-20 minutes Cook time: About 12 minutes
Ingredients: For the sandwich: 2 slices French bread (or the bread of your choice) 2-3 thin slices roast beef 1 slice gruyere cheese (or several tablespoons grated gruyere, or the cheese of your choice) 3-4 button mushrooms, thinly sliced 4-6 spinach leaves, trimmed 2-3 red cabbage leaves, very thinly sliced 2-3 thin slices red onion 3 tablespoons olive oil
For the dressing: 1 teaspoon red wine vinegar 1 teaspoon Dijon mustard 1 tablespoon parsley, finely chopped 2 tablespoons olive oil
1. Turn on panini maker. If applicable, set to medium-high setting.
2. Make the dressing: Whisk together red wine vinegar, Dijon mustard and parsley. Slowly whisk in the olive oil. Set aside.
3. Wash, dry and slice the vegetables (mushroom, spinach, red cabbage and onion). Lightly toss the sliced mushrooms in the vinaigrette and set aside.
4. Warm 1 tablespoon olive oil in a pan. Add the red onions and soften, cooking over medium heat about 2 minutes. Add the red cabbage and cook until slightly softened, about 3 minutes. Set aside.
5. Brush dressing onto the inside slices of the sandwich bread. Layer all the vegetables (raw and cooked) onto one of the slices of bread. Add meat and cheese. Place other slice of bread on top.
6. Lightly drizzle both outsides of the bread with remaining 2 tablespoons (or perhaps even less) olive oil. Press into panini maker until light golden brown. (If using a medium-high setting, this should take about 12 minutes.)
My Notes: Why the vegetable saute? To be honest, I sort of cheated with the red onion-and-red-cabbage saute. I sauteed them the night before for dinner, and just used the leftovers in my sandwich. You can nix these components if you don't feel like sauteing, but I thought the cabbage gave a textured light bitterness that paired well with the slightly sweet but tart red onions. And this mixture is a nice contrast to the raw mushrooms and spinach.
Why the vinaigrette? Because this panini is essentially a salad (with protein and cheese) tucked into bread, the vinaigrette gives a boost of bright flavor, one that complements the veggies perfectly.
Why toss only the mushrooms in the vinaigrette? For flavor and neatness. The mushrooms are little pieces that carry the vinaigrette well. Because they're little, they won't drip oil 'n vinegar onto your panini maker, and they keep the sandwich easy to eat.
Since beginning my education at Le Cordon Bleu this past September, I've made about 50 recipes -- mainly, various sauces, soups, salads and vegetables. But of all the ones I've learned, this Spinach-Endive Salad is by far my favorite and so, I've decided to share my spin on this classic dish. Called Salade d' Epinards by the French, it has enough protein to stand as a main dish, enough greens to make you feel like you're treating your body, and enough acidity from the garlic-parsley vinaigrette to give it that fresh, bold flavor that keeps your tastebuds tantalized. Still unsure? It has egg. And bacon. Read on...

Serves: 1 Prep time: 15-20 minutes Cook time: 10 minutes
Ingredients: For the salad: About 1 cup spinach, trimmed 3-4 stalks endive 1 strip bacon, sliced in 1/4" pieces About 2 teaspoons olive oil 1 egg, poached 2 teaspoons white vinegar salt/pepper
For the vinaigrette: 2 tablespoons red wine vinegar (or less, if desired) 1/4 teaspoon Dijon mustard 1-2 garlic cloves, finely chopped About 1/4 cup olive oil (or less, if desired)
1. Prepare the vinaigrette: Finely chop the garlic cloves. Whisk in with red wine vinegar and Dijon mustard. Slowly stream in the olive oil, whisking throughout.
2. Wash and trim the spinach. Wash endive and pluck the leaves from stalks. Season the greens with salt and set aside.
3. Start boiling water to poach egg.
4. Cut up the slices bacon and saute in 2 teaspoons olive oil, until colored. Set aside on a paper towel.
5. Remove pan from heat and let cool about 1 minute. Do not throw out fat. Add vinaigrette, mixing with the fat. Add spinach and endive to the pan, tossing well into the dressing.
6. Poach the egg: When water comes to a boil (some bubbling at the surface) add 2 teaspoons white vinegar and turn down heat to a low simmer. Crack egg and gently open just over the water (so as to avoid splashing). Or, crack the egg into a separate small dish and pour into simmering water. Let cook just until egg white is set, about 3-4 minutes.
7. Mound spinach and endive on a plate. Sprinkle bacon bits on top, then set the poached egg on top.
My Notes Why should I keep the fat in the pan? Because bacon is delicious! The fat rendered from this salty pork product is a flavor that mixes with the vinaigrette well. Plus, that meaty kick is then incorporated throughout your entire salad.
Why so little Dijon? Why even bother adding the mustard if it's so little? Well, the Dijon acts as a binder to help the ingredients of the vinaigrette mix together better. And I'm a mustard fiend. It also helps mellow out the bright acidity of the red wine vinegar.
Too much dressing? This recipe may yield a touch too much vinaigrette for your liking. I don't always use all of it. One good indicator of whether your salad is overdressed is making sure there isn't dressing pooling beneath your greens.
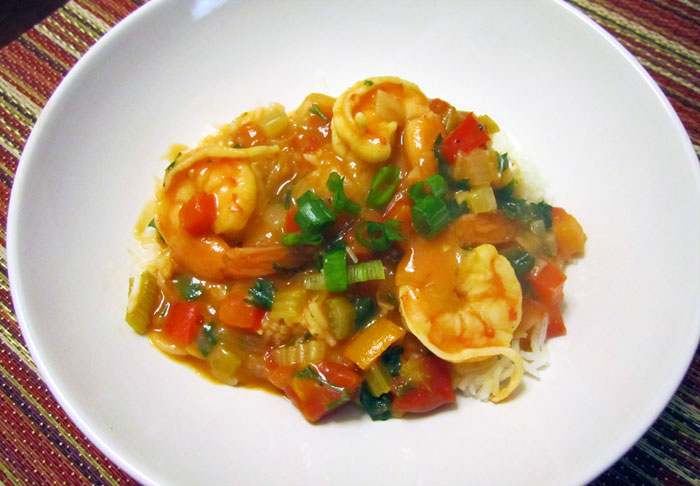
If you're a seafood lover, you need this shrimp étouffée recipe in your arsenal. It isn't the quickest recipe -- but it's fun. And easy. Think of it as one of those recipes you save for when you really want to impress dinner guests. With all the fresh veggies and variety of spices, they'll think you're a longtime chef with a sophisticated palate. Serve it over rice or dunk warm slices of bread in the thick, savory sauce. Adapted from Scott Hargrove, Emeril Lagasse and Paula Deen, this versatile étouffée can be made with either shrimp or crawfish. Use a bit more or less flour for thicker or thinner sauce. Add a dash extra Tabasco and cayenne to amp the spiciness level; or if you like, nix it entirely.

Serves: 6 Prep/cook time: 45 minutes Simmering time: 30 minutes
Ingredients: 2 pounds shrimp, shell/head on 1 quart plus 1 cup water 1 medium onion 4 celery stalks 2 green bell peppers 6 garlic cloves 1 stick butter 3/4 cup flour 1 14.5 ounce can diced tomatoes 2 bay leaves 2 teaspoons smoked paprika 2 teaspoons salt 1 teaspoon black pepper 1 teaspoon garlic powder 1/2 teaspoon onion powder 1/2 teaspoon oregano 1/2 teaspoon thyme 1/4 teaspoon cayenne (1/2 teaspoon for medium spiciness) 2-3 dashes Tabasco sauce (optional) 3 scallions, chopped
1. Make a quick shrimp stock: Peel and de-vein the shrimp, and set aside. Place the shells, heads and tails in a 3-quart saucepan. Add 1 quart plus 1 cup water over low heat. Let simmer for 45 minutes.
2. Do some chopping: Meanwhile, chop the onions, celery and bell peppers into a small dice, about 1/4-inch chunks. Mince the garlic. (This might take 20-25 minutes.)
3. Make a roux: Melt the butter in a large pot over medium heat. (To help prevent burning, start with a room temperature pot, add the butter, then turn on the stove.) Add the flour and stir continuously to make a roux. Stir the roux over medium heat until it smells nutty and is light brown, about 7 minutes.
4. Add the onions, bell peppers, and celery to the roux, and cook, stirring often until slightly softened, about 5 minutes.
5. Add the garlic and canned tomatoes and stir in the bay leaves and herbs/seasonings (e.g. smoked paprika, salt, black pepper, garlic powder, onion powder, oregano, thyme, cayenne pepper and Tabasco sauce). Cook the mixture for 3 minutes.
6. By now, the shrimp stock should be done. Strain out the shells and pour all the liquid into the pot. Stir well.
7. Bring the mixture to a boil, and reduce to a simmer. Stir occasionally, for about 30 minutes.
8. Add shrimp, stirring to evenly distribute. Cook the shrimp until done, about 3-5 minutes (when the gray turns pinkish orange). Season sauce to taste. Serve over rice; garnish with scallions.
My Notes How I got the recipe: A good friend of mine forwarded me Scott Hargrove's recipe and I took it upon myself to sift through various other étouffée recipes, in particular, the ones from Emeril Lagasse and Paula Deen. I stuck mainly with Hargrove's recipe but also used Lagasse's Creole seasoning and took into account Deen's tips regarding spiciness and cook time for the shrimps. Lagasse's Creole seasoning is a must; it packs a nice Cajun kick, what with the paprika, garlic powder and herbs.
Can I use oil instead of butter? Yes! Paula Deen's recipe calls for 1/2 cup of oil rather than the stick of butter because butter burns more easily. To ensure you melt it properly, start with the pot at room temperature, add the butter, then heat the pot.
How to de-vein shrimp: Gently but quickly rip off the shrimp heads; they should come off easily. Take a pair of kitchen scissors and snip a small slit across the back of the un-peeled shrimp, inserting the blade about 1/3 of the way through. Peel off the shell and legs. From here, wipe off the intestinal tract, or what looks like black thread.
Savory, meaty, tender, juicy -- all piled onto a toasted bun. There's garlic, onion, spices... and beer. What more could you want in a comfort food? Try this hearty sloppy joe recipe adapted from AllRecipes.com. I tweaked a few things by adding more garlic, more tomato paste and more spices. Not only are these sloppy joes easy to make, but they're also great as leftovers. They keep for several days and are a cinch to store.

Makes: About 8 burgers Prep time: 10 minutes Cook time: 25-30 minutes
Ingredients: 2 tablespoons olive oil 4 cloves garlic, minced 1.5 pounds ground sirloin 1 onion, chopped 2 tablespoons chili powder 1 teaspoon paprika 2 teaspoons ground cumin 1 12 ounce can tomato paste 1 cup beer (medium-bodied) 1 teaspoon distilled white vinegar 2 tablespoons brown sugar 2 teaspoon dried oregano salt and pepper, to taste 8 hamburger buns, split
1. In a large pot over medium-high heat, heat oil. Add the garlic and saute the ground sirloin for 5 minutes. Add the onion and saute for 5 more minutes, or until onion is tender. Add some salt and pepper while cooking. Drain the fat.
2. Mix in tomato paste and beer, stirring until well-combined. Stir in chili powder, paprika, cumin, vinegar, brown sugar, oregano and more salt and pepper. Continue to heat for about 5 minutes, then let simmer about 10 minutes more.
3. While the mixture is simmering, pop the hamburger buns on a toaster oven at 250 degrees, for about 3 minutes. Spoon meat onto buns and serve.
My Notes What I did differently from AllRecipes.com I changed one of the ingredients and some of the proportions. The biggest change I made was using beer instead of water, and ground sirloin instead of ground beef. As for the proportions, I used more garlic, chili powder and cumin and less brown sugar. I also nixed the red bell pepper. Why? I wanted a stewier, bolder comfort food. And because I like meat and onions so much, I disregarded the red bell pepper -- after all, you can barely taste it in this mix of meat and spices.
Why use beer? A medium-bodied beer gives the sloppy joe a richer, earthier, thicker taste.
More or less saucy? Since I like the meat filling to be saucy, I used twice as much tomato paste than AllRecipes did. I wanted the satisfying, tangy taste dripping out of the bun.
Sugar warning: I found the original recipe to be too sweet, what with 3 tablespoons brown sugar. I cut it down to 2 tablespoons and was much happier with the result. You shouldn't nix it entirely because you need that sticky sweetness to counteract the vinegar's sourness and tomato's tanginess.

"Why go out of your way to make syrup when you can just buy it at the store?" I asked my roommate when she insisted we make syrup from scratch. But seeing as how she agreed to make the pancakes, I deemed it reasonable that we do the syrup her way.
After sifting through a few Google search results, I came across an easy vanilla syrup recipe from Food.com; all you need is water, sugar, vanilla extract, and about five minutes. Although it's high in sugar, the result is purer than the store-bought alternative. Here, you don't have to worry about preservatives and high fructose corn syrup.
Serves: Enough syrup for 4-6 servings of pancakes/waffles
Cook time: About 5 minutes
Ingredients:
1. Heat the water and sugar in a small, uncovered saucepan at medium-high heat, until it boils, about 4-5 minutes. Make sure to stir occasionally. Once the mixture is smooth and the sugar is melted, turn off the heat.
2. When the mixture starts to cool, stir in either the vanilla or maple extract.
My Notes:
Vanilla or maple extract? While I appreciate the earthy, molasses-like flavor of maple extract, I prefer the lighter, more floral sweetness of vanilla extract in my syrup.
What I did differently from Food.com: Because I wanted to ensure a thick-enough syrup, I used more sugar.
Depending on who you are, when faced with a pound of raw shrimp, you either roll up your sleeves, get peeling and whip up your favorite recipe, or you cringe and tentatively poke the cold, gray bag. If you fall in the latter category, fear no more -- though this dish has several ingredients, it's easy to make and it's foolproof. And if you already have your own go-to shrimp prep steps, give this recipe a whirl. It's savory, saucy and has hints of Cajun flavor.

Serves: About 6-8 Prep time: 25 minutes Cook time: 7 minutes
Ingredients: 1 pound raw shrimp, peeled and de-veined 1/2 stick of butter (or 4 tablespoons) 1-2 tablespoons minced or crushed garlic 2 tablespoons Worcestershire sauce 1 tablespoon basil 1 teaspoon oregano 1 teaspoon cayenne pepper (optional) salt and pepper, to taste
1. Melt the butter in a skillet on medium-low heat. Add garlic and a sprinkle of salt and pepper. Increase heat to medium and add the peeled and de-veined shrimp. Stir.
2. After about 2 minutes, add the Worcestershire sauce, oregano, basil, cayenne pepper and a dash more salt and pepper. Keep stirring and turning shrimp until they curl and turn slightly pink. (Hint: Cook until you don't see any more gray).
My Notes: Changing the proportions: My favorite thing about this recipe is that while the flavors are sophisticated, cooking is a snap because you don't have to measure out each ingredient. Does the shrimp look a little dry? Add a dash more Worcestershire. Not seeing enough flecks of herbs? Toss in another pinch of oregano and basil. Not enough heat? Of course, sprinkle a bit more cayenne pepper.
How to de-vein shrimp: Some chefs would say de-veining is an absolute necessity; the cooked shrimp looks fuller, curlier and neater. And after all, it is cleaner; eating poop isn't necessarily on everyone's to-do list. Others shrug off the practice and prefer the shrimp in their natural state. In order to properly de-vein, take a small knife and cut a small slit across the back of the shrimp, inserting your blade about 1/3 of the way through. From here, wipe off the intestinal tract, or what looks like black thread.
Everyone needs this recipe in their arsenal -- the perfect party treat that all guests look for when they arrive to your house. The specialty my mom's known for is fruit salad. For my aunt, it's coconut pie. For my girl friend, it's jalapeño-spinach-artichoke dip. And me? It's stuffed mushrooms. Prep time is fairly minimal, cook time is a snap, and the results have my guests begging for the recipe, thinking I spent years perfecting this Italian appetizer. (But really, I've perfected the recipe in one shot after a friend passed it on to me).

Makes: About 3-4 dozen mushrooms Prep time: 20 minutes Cook time: 8 minutes
Ingredients: 2 packages whole mushrooms (about 3-4 dozen mushrooms) 2 cans crab meat (6 oz each) 2 cups shredded or powdered Parmesan cheese 3/4 cup butter, melted 1/3 cup green onions (or chives) salt and pepper, to taste
1. After rinsing and draining mushrooms, pluck stems out and, if needed, carve a small indentation to accommodate for filling. Set aside.
2. Chop about half of the remaining mushroom stems and add to mixing bowl. Mix in Parmesan cheese, crab, melted butter and chopped green onions. Add salt and pepper, if desired.
3. Scoop and stuff mixture into each mushroom cap (which may be about 1 tablespoon of stuffing per cap).
4. Arrange stuffed mushrooms on a baking sheet, sprinkle a little more salt and pepper. Broil for 7-8 minutes, or until the tops are light golden brown.
My Notes How to take off mushroom stems: Hold the mushroom in your palm, stem facing up. With your thumbs, gently push the stem until it snaps. It should give way easily; if not, rotate the mushroom and push the other side. This ensures you don't break the cap.
A non-crab variation? Crab meat can be expensive, especially if you're making this recipe in large quantities. A good substitute is spinach and a few basil leaves. Use 1 cup chopped spinach with several chopped basil leaves for a boost in flavor and freshness.
A meat-lover's variation? And if you prefer meat over crab, try using spinach with bacon bits. Try 3/4 chopped spinach with 1/4 cup bacon bits for a salty, meaty kick.
What to do with the extra filling? Sometimes the ratio of stuffing to mushrooms is uneven, but it's definitely better to have too much rather than too little mix. If you find yourself with an excess, try spreading it on a baguette and toast in the toaster or conventional oven until the cheese melts.